Quantcast
Channel: Don Bastian Wet Flies
Viewing all 111 articles
Browse latest View live

Brookie Fin – Classic Wet Fly

$
0
0

The Brookie Fin is another of the six (known to me) historic brook trout fin wet fly patterns. This pattern was published in Helen Shaw’s second book, Flies for Fish and Fishermen: The Wet Flies, 1989, Stackpole Books. I uncovered mention of using the brook trout fin for bait in Favorite Flies and Their Histories, 1892, by Mary Orvis Marbury. I remember my dad telling my brother, Larry, and me about that when we fished small mountain streams in northern Lycoming County, Pennsylvania, back about 1961 or ’62. We scoffed. He promptly gave a demonstration; taking a fin cut from a brook trout, impaling it on a hook, swinging it into a small pool, and catching a brookie on the first cast.

Here is an instructional paragraph from Shaw’s book:

“The wing for our Brookie Fin is a built-wing. This time it is made with four strips of different colors of goose, three of which have been dyed. The main strip of the wing is orange. Above it is a narrow strip of red; above that, a narrow strip of black; and over it all you will use a narrow strip of white. The exact number of flues for each color depends on the width of the finished wing for the particular size of hook you are using. The feathers from which you take the strips of flues for the wing also have some bearing on how many or how few you will need. Some goose pointers have wider flues than others. Suffice it to say that the strips of flues above the main part of the wing are narrower by comparison. The four colored strips together should not be any wider than the width of a wing made of a single colored strip.”

Here is an image of a Brookie Fin that I recently tied:

Brookie Fin - classic wet fly pattern from Helen Shaw's book.

Brookie Fin – classic wet fly pattern from Helen Shaw’s book. Tied and photographed by Don Bastian.

Brookie Fin

Thread: Danville Flymaster 6/0 #100 Black

Ribbing: Oval silver tinsel; Shaw’s dressing calls for silver wire

Body: Flat silver tinsel

Hackle: White hackle fibers; Shaw’s original dressing calls for polar bear

Wing: Narrow strips of white, black, and red; married to and topping remainder of orange goose quill sections

Head: Black

Shaw’s formula in the recipe plate for the Brookie Fin calls for making the wing 2/3 orange, and 1/9 each Red, Black, and White. That is accurate, but personally I don’t feel like doing more math than I absolutely have to, especially math with fractions, and when I’m tying flies to boot. I generally use two strips each of white, black, and red, and make the rest of the wing, about 2/3, orange. That’s good for #4, #6, and #8 hooks. On a #2 hook, I’d go with three barbs or flues, and on #10 and #12 hooks, one must use only a single barb each of the topping colors. This type of detailed married-wing wet fly tying is what separates the men from the boys, or the women from the girls. It requires good keen eyesight, and steady hands.

No mention of the origin of the Brookie Fin appears in Shaw’s book, but it is quite likely that she originated it. She concluded her writing on the Brookie Fin with these words: “This is an exceptionally good wet-fly pattern, producing strikes when other patterns may prove to be ineffectual under many fishing conditions.”

About Helen’s book, Paul Schullery, former Executive Director of the American Museum of Fly Fishing in Manchester, Vermont wrote:

“Helen Shaw has long been recognized as one of this century’s foremost fly-tying teachers. With this book, she brings fly tying’s oldest and grandest tradition back to center stage. Not since Mary Orvis Marbury’s Favorite Flies and Their Histories was published nearly a century ago (now 121 years) has the wet fly been so well celebrated in words and pictures.”

The book is out-of-print, but may be found if one looks. The ISBN No. is: 0-8117-0607-9.

Though originally published in 1989, Flies for Fish and Fishermen: The Wet Flies remains as the best wet fly tying instructional book presently available. – Don Bastian.


Parmacheene Belle – Revisited

$
0
0

Here is another Parmacheene Belle wet fly. This dressing is correct according to the original recipe written by the originator, Henry P. Wells, in the 1883 book, Fishing With the Fly, co-authored by Charles F. Orvis and Albert Nelson Cheney.

One of the commenters on my last post of this pattern on classicflytyingforum.com, of several weeks ago now, correctly observed that the hackle was a little full, and perhaps too long. (That fly was posted here a couple-three weeks ago). It may have been, especially a tad long, but generally, in the traditional tying style of the period (19th century), hackles were longer rather than shorter, and they were more full, rather than sparse. Tying styles and preferences can change over time, but I am a firm believer in tying and replicating flies in their original dressings and style if possible.

For example, many tiers use goose shoulder for wet fly wings, particularly married wings. My belief is: you have to use goose shoulder, but only for married wings in patterns that also call for turkey. Technically, this does not change the pattern correctness, but in actuality, goose shoulder was not used much for primary wing construction on commercially-tied wet flies of the 19th and 20th centuries. Otherwise, the Parmacheene Belle, for example, and nearly all other married wing wet fly patterns use goose or duck wing quills for the wing. There were some exceptions, as in a married wing pattern like the Munro, Silver Doctor, Lake Edward, and Ferguson, because these patterns also use turkey, which does not marry well to duck or goose wing quill sections. Hence my comment above about marrying goose shoulder to turkey. This is the Prime Directive of Married Wings – “always maintain uniformity of texture as much as possible.” The 19th century “married” wing, or more correctly named, “mixed wing” version of these patterns was generally tied with a full wing of turkey mounted first, then followed with “splits” of other colors; usually of goose shoulder, laid over the wing.

My thought is this: A Black Prince Lake Fly, for example, is properly tied and historically correct with a wing of goose wing quill. When tied with a wing of black goose shoulder, it may look good, but it (goose shoulder) generally gives the fly a “too-low” wing profile, at least when considering it as an accurate representation or rendition of a 19th century classic pattern. The low-swept wing makes it look more like a contemporary  steelhead or salmon pattern, rather than a 19th century fly, which would have the wing at a sharp upward angle of forty-to-fifty degrees. A quick glance at the color plates of the Lake Flies, Bass Flies, and Trout Flies in Marbuy’s book confirms this.

So in my case, until just a few years ago, my personal representation and tying of wet flies was in the 20th century style, with wing-tips up, melded with the divided wing style (formerly my favorite) preferred by J. Edson Leonard, author of Flies, 1950, and opposing Bergman’s method (and the generally accepted traditional method) of mounting wet fly wings with concave sides together. My 2010 wet fly article in Hatches Magazine presented the four different methods or styles of setting wet fly wings. All are correct in my view. More recently I have been somewhat converted to the older looking, more traditional, and more historically correct method of setting the wings with the tip down, giving the wing a slightly lower profile, and a perhaps more pleasing to the eye, sweeping natural curve that starts right at the base of the wing at the tie-in point. This is the result of my observation and study of the display flies from the 1893 Orvis Exhibition in the American Museum of Fly Fishing in Manchester, Vermont, and my good fortune to have been granted access to, and held (while wearing white cotton gloves), examined, and photographed the “holy grail” of the thirty-one actual fly plates that were used for the artist’s paintings for Mary Orvis Marbury’s 1892 epic book, Favorite Flies and Their Histories. There were thirty-two original plates in Marbury’s book, but Plate Z is missing from the museum collection.

The angle and mounting style of the wings was also different in the 19th century. Nearly all wet flies, whether using single or married quill feather sections, whole “spoon wing” feathers, or tips of gray mallard, barred wood duck, bronze mallard, or quill wings with splits, were all tied “reverse-winged.” That is, with the wing tied down, butt ends to the rear, tips pointing forward over the front of the fly, then pulled back over and lashed in place with a half dozen or so wraps. The bulky head of the fly included the visible folded-over butts of the stems or quill sections. This also gave the wings a higher angle relative to the body. This technique was used on blind-eye and eyed hooks, that became increasingly more popular just one year after Marbury’s book was written. John Betts wrote an article about the reverse-wing method in a 1996 article in The American Flyfisher, the magazine of the American Museum of fly Fishing. Well, I’m getting carried away, or free-lancing my thoughts on this topic…

More of this type information will be in my upcoming book, Favorite Fishing Flies – 1892, which includes all 291 of the patterns published in M. O. Marbury’s Favorite Flies and Their Histories, 1892, plus more than 200 additional patterns from the Orvis archives.

Here is the Parmacheene Belle, original pattern version; this is tied on a  size #2, vintage Mustad 3399 wet fly hook.

Parmacheene Belle -

Parmacheene Belle – this version is tied divided wing, “tip-up.” The yellow rabbit dubbing substituted for the original yellow mohair does a reasonable job of imitating the original material. Some later 20th century commercial versions of the Parmacheene Belle eliminated the silver tinsel tag, and changed the butt to black ostrich herl, and the body to yellow floss.

The only recipe change I made is I used yellow rabbit dubbing in place of Wells’ original yellow mohair specified on the body.

In March of this year, I taught an extended weekend fly tying class for Wilson’s Fly Shop of Toronto and Fergus, at a Bed and Breakfast in the lovely town of Fergus. We covered traditional wet flies, Carrie Stevens streamers using her proprietary methods, and on Sunday morning, flies from Marbury’s book. When the subject of reverse wings came up, it was unanimous that the students wanted to try this. The only problem was that the instructor, yours truly, had never done it. Their desires prevailed against my hesitation, so it was agreed that attempting the reverse-wing tying method would be a learning experience for everyone. We tied at least three patterns using this method, and everyone did fairly well with the process, despite it being a totally new experience for everyone.

One of my Canadian friends, John Hoffmann, of Fergus, tied a few patterns for my book. John works part-time for the Fergus location of Wilson’s, and also guides and does some teaching of fly tying and fly fishing for the shop. Besides the bed and breakfast stay where the class was held, John, his wife Cathy, and their Airedale, Gracie, were my hosts for a few extra days. Thanks John, Cathy, and Gracie!

I intend to make the posting of those patterns, my first effort at reverse-winged flies next on my blog – hopefully later this week. Thanks to everyone for your subscriptions and devotion to my writings!


Old Wet Flies

$
0
0

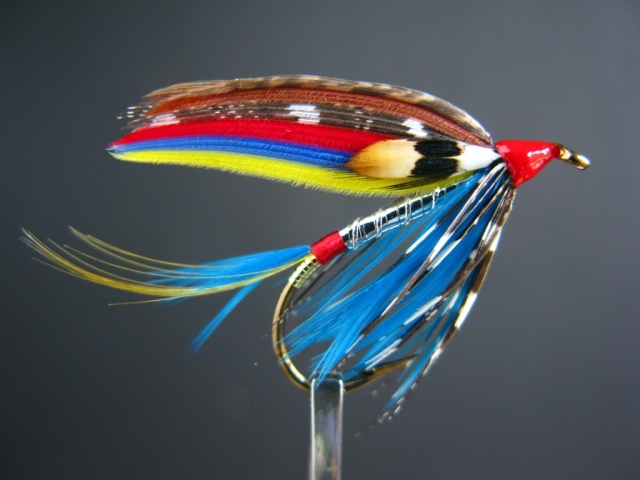
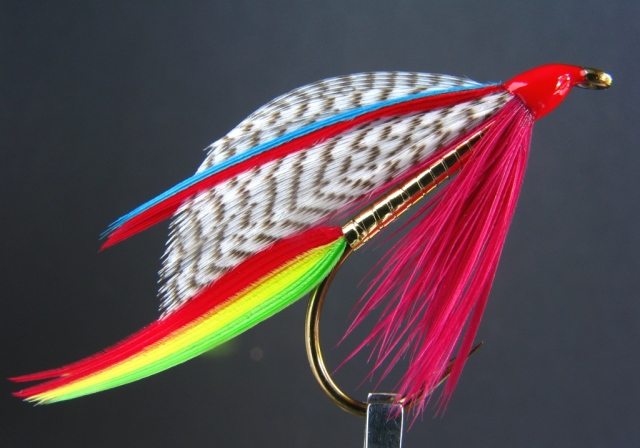
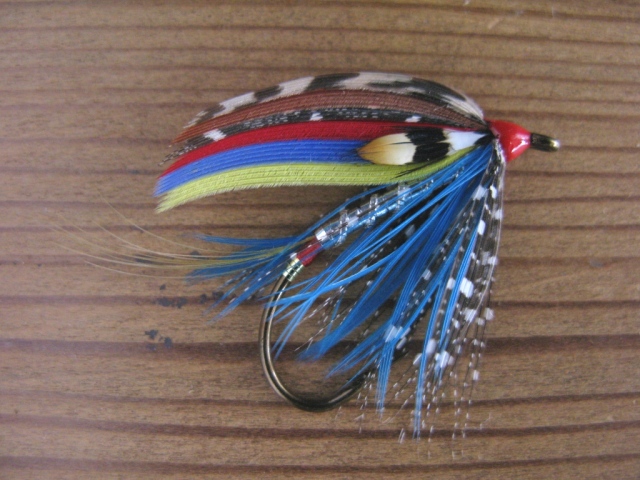
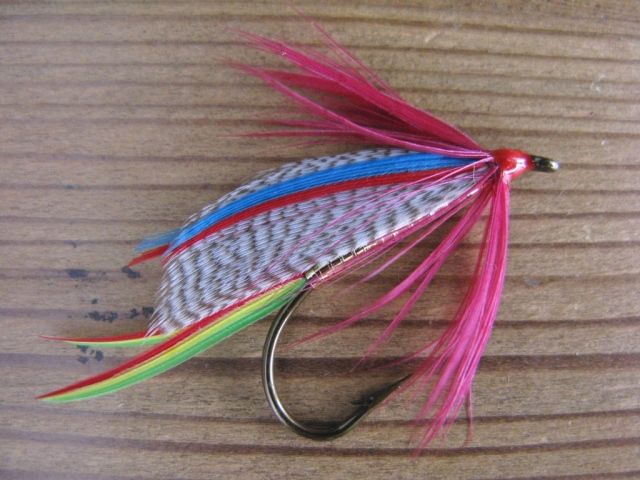
These are some classic wet flies, tied with gut snells, on traditional style barbless hooks. In 2011 at the Fly Fishing Show in Marlborough, Massachusetts, a man came to my table and told me about some old wet flies he had. He didn’t have them with him, but he did bring them to the show, they were in his car. When he brought them in and opened the container, I was pretty impressed with the flies, the quality of the tying and the array of colors. It was a real nice cache of classic brook trout flies. With his permission I took some photos:

A collection of classic barbless wet flies, probably circa the teens or the 1920's.

A collection of classic barbless wet flies, circa the early 1900′s. Note: they are snelled, but on eyed hooks. Some of the patterns include: Coachman, Silver Doctor, Parmacheene Belle, Colonel Fuller, Jock Scott, Black Gnat, and what I believe to be a couple Montreals. They are all tied with doubled-gut at the hook eyes. This was sometimes done to increase the strength of the gut at its weakest point, the hook eye, due to the strain of playing fish.

Notice how the tips of the quills have been clipped on the turkey-winged patterns. This must have been an effort by the tier to “clean up” the ends that are a result of the tips of the barbs being thin and wispy.

I was particularly imressed with this jay-winged pattern; it is unlike nay of those that I have seen previously. I have no idea what this fly is named, but it's areal beauty, in my opinion.

I was particularly impressed with this jay-winged pattern; it is unlike any of those jay wing flies that I have seen previously. I have no idea what this fly is named, but it’s a real beauty, in my opinion. All these flies were dressed on hooks that appeared to be size #6 and #8.

I have had these photos for over two years, and have wanted to post them on my blog, but like so many things, out-of-sight, out-of-mind, or some other excuse. Anyway, at long last, here they are. Enjoy!

Edit: If you check the comments, Bob Mead asked the question about what manufacturer made these hooks. I did not know, but posted these photos and asked the question at Classicflytyingforum.com, Lee Schecter of Connecticut gave this reply: ” Those barbless hooks are “Jamison” – made in the 1920s by Allcock in the UK solely for WJ Jamison company of Chicago – thus they were marketed as Jamison hooks – not Allcock.” Thanks Lee!


The Companion To Alfred Ronalds Fly Fishers Entomology

$
0
0

I just placed this item for sale on eBay: http://cgi.ebay.com/ws/eBayISAPI.dll?ViewItem&item=130965401615

Top-half view if the front cover

Top-half view of the inside front cover to, The Companion to Alfred Ronalds Fly Fishers Entomology, 1862.

It is an original, circa 1862, edition of The Companion, which accompanied the sixth printing of Ronalds’ work. I have owned this item for a number of years, and decided to put it up for sale. Before it is no longer in my possession, I will take photos of each page, listing the 47 fly patterns named herein, and maybe if I can find recipes for them, it would be nice to replicate the patterns and post each fly with the matching name and description from this classic work. I thought the historical nature and posting of this memorabilia would be interesting. Here are a couple more photos:

Flies for March.

Flies for March.

Flies for March, with opposite vellum folds for fly storage.

Flies for March, with opposite vellum folds for fly storage. This page is the worst in terms of condition.

Flies for April.

Flies for April.

Many of these fly names are right out of Mary Orvis Marbury’s 1892 book, Favorite Flies and Their Histories. Those of you familiar with her book, may not have realized that many of the patterns in her book were already more than seventy-five years old, some of these pattern listed in Ronalds book are much older than that, having been written about by Izaak Walton and Charles Cotton.

Flies for May.

Flies for May.

Antique snelled wet flies, on the interior bound-in felt page.

Antique snelled wet flies, on the interior bound-in felt page. There are three modern eyed hooks among the thirteen antique flies; hook sizes are all small, probably no larger than a #14. Ravages of bugs are evident. The hooks are still good, and the gut as well, could probably be used to replicate antique wet flies. (Soak well in water before attempting this). How about the Hare’s Ear in the lower center, still in very good condition; looks like the wing could possibly be whimbrel or curlew; a material no longer readily available, if even legal, yet it was once popular in some old patterns.

Macro image os small wet fly, approximately a #16 hook.

Macro image of small, quill-bodied wet fly, approximately a #16 hook.

Flies for August.

Flies for August.

Thus concludes another bit of fly fishing history .Thank you for reading.


Classic Wet Fly – Tying Class

$
0
0

Last March I taught a classic wet fly class at Eldredge Brothers Fly Shop on Rt. 1 in Cape Neddick, Maine. Please check their link on my Fly Shop link list on the right. I hope they will invite me back this year; well, next year, since it would be in 2014. It’s a good possibility they’ll want me to return, since this year’s class booked full with thirteen students in less than two weeks when announced in October. Moreover, people registered on a cancellation list, and then more people were turned away because the waiting list was “a mile long.” I heard all this through eight or nine people who I spoke to at the Marlborough Fly Fishing Show and at the L. L. Bean Spring Fishing Expo, who informed me they wanted to sign up but were too late. It’s gratifying to have affirming interest like that pertaining to one’s avocation.

I have wanted to post a review of that class here on my blog, but like other topics, there is only so much time in a day. I intended to post each individual fly pattern and recipe for interested persons, but I’m having some trouble with my camera. Seems it will not function properly on “TV” mode, aka “Shutter Speed Priority” setting. I was forced to shoot these images on “Auto,” consequently I lost all control over depth-of-field. After previewing the individual images, I decided they are not up to my usual standards, so they won’t be included here, sorry folks. Moreover the mom-and-pop camera shop where I bought my camera has since gone out of business, a victim of “big-box store” competition.

One thing I hope to accomplish with this post was to review my itinerary and maybe have interested persons, fly shops, or organizations consider booking me to teach a class. That’s what I do, in part, to earn my living. So I hope everyone realizes that fact without me seeming to be “too commercial.”

I have also recently started teaching private lessons here at my home. This can be for a day or two, accommodate one to three persons, and include meals and lodging if desired. Depending on time of year, some fishing can also be included. Please contact me for more information. Topics available are classic dry flies, classic wet flies, 19th century wet flies – including traditional tying styles on authentic antique blind-eye hooks, streamers and bucktails, specializing in Carrie Stevens unique Rangeley method of streamer component assembly, and general tying of all-round fishing patterns, nymphs, drys, emergers, and soft-hackles. I have almost fifty years of experience, and thirty years of teaching fly tying classes. All materials are provided for my private lessons.

The class at Eldredge Brothers originally was to include nine wet fly fly patterns, but with experienced students in attendance, we moved along a bit ahead of schedule. The Coachman was tied to demonstrate a point in response to a student question, and when we finished about forty minutes early, I added the Parmacheene Belle as the final pattern after the student’s unanimous vote.

The list of flies included the teaching of Helen Shaw’s seven different wet fly body components; chenille, dubbing, floss, herl, quill, tinsel, and yarn. A variety of four different wing-mounting methods was included, as well and multiple methods of hackling. The patterns started out with the simplest ones first, gradually progressing in complexity, presenting increasing difficulty, and concluding with the Ibis and White, Armstrong Fontinalis, and the Parmacheene Belle. You’ll also note on the Reuben Wood that I included a pattern with a gray mallard wing, since that seems to be a frequent question.  In addition to goose and duck quill wings, we also included wings of turkey wing and tail feather sections.

Below is a photo of the flies from the class:

Alder, Brown Turkey,

Starting at top row, left to right: Alder, Brown Turkey, Coachman, Black and Silver, Black Quill, Reuben Wood, Captain, Forsyth, Ibis and White, Armstrong Fontinalis, and Parmachenne Belle. All flies are dressed on #6 hooks, Mustad 3366 straight eye, except for the Coachman, it’s on a #3399 Mustad, and the Parmacheene Belle is on a #4 – 3399 hook. Tied and photographed by Don Bastian.

The Alder is supposed to have a wing of brown mottled turkey, but I had plenty of gray turkey, so we used that instead, since my objective in tying this pattern, besides this being a herl-bodied fly, it  was more about preparing and mounting the softer turkey wing than about having the exact color. These are all good fishing flies, they were historically, and still are today.


Project Healing Waters – Fly Tying

$
0
0

“Project Healing Waters Fly Fishing Inc. is dedicated to the emotional and physical rehabilitation of disabled active military personnel and disabled veterans through fly fishing and associated activities…”

From the Project Healing Waters Fly Fishing, Inc. web site:  http://www.projecthealingwaters.org/

To read more please visit their web site, and also the Project Healing Waters facebook page.

This post was prompted by a comment from a fly tying instructor at Quantico US Marine Corps Base and Ft. Bevoir, regarding my last post, Classic Wet Fly – Tying Class. Here is the comment in its entirety from Jim Ottevaere:

Mr. Bastian,

Fly tying is a central focus of our Project Healing Waters program here at Quantico USMCB and Ft. Bevior. Your web-site has been very useful to us. Your photos are excellent and your recipes are straightforward. Thank you for providing such a useful training aid to our wounded and injured Soldiers, Marines and disabled veterans.

This photo is a plaque that was recently presented by us Quantico volunteer to a retiring Marine member of our fly tying program. The fly bodies represent the ribbon colors of each one of this highly decorated Marine’s personal awards, including the Bronze Star and the Marine Combat Medal.

It is not too far a stretch to say that your fly tying was the inspiration behind choosing traditional wet flies for this presentation.

Best,

Jim Ottevaere, PHWFF Fly tying instructor Quantico, USMCB

I am pleased to post the photo of the award frame that was sent to me by Mr. Ottevaere, and put together by the Project Healing Waters Fly Fishing volunteers and participants. I am also deeply honored and moved by Mr. Ottevaere’s kind and complimentary words; the fact that I have been a helpful part of this program and an inspiration, without even knowing it, provides proof that we never know what impact our efforts and actions may have, in some cases reaching far beyond what we perceive to be the immediate sphere of our influence. These veterans and the volunteers are to be admired for their service, dedication, commitment, and their efforts to help active and veteran disabled US military personnel. Here is the photo of the award frame:

Project Healing Waters Fly Fishing Inc, presentation frame of contemporary designed classic wet flies.

Project Healing Waters Fly Fishing Inc, presentation award frame of classic wet flies, the designs were inspired by the colors of US Marine Corps Medals. The individual fly tiers are unknown.

Thank you to Jim Ottevaere and his crew of volunteers at Quantico USMCB and Ft. Bevoir for their dedication and devotion to project Healing Waters Fly Fishing, Inc.


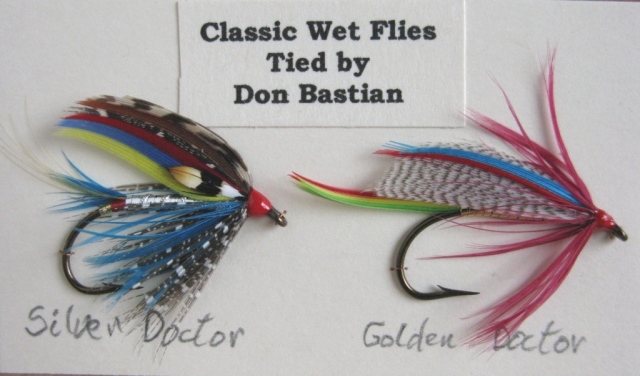
Silver Doctor and Golden Doctor – Classic Wet Flies

$
0
0

I recently added a couple new items to my product page at MyFlies.com, and I wanted to share these items with my readers. The items are Boxed Collector’s Sets of paired classic wet flies. The first to go up was the Silver Doctor and Golden Doctor, then a couple weeks later, this past weekend actually, the second set was posted – The Parmacheene Belle and the Trout Fin. All four are classic wet flies that were (or could also be) classic Lake Flies. In fact only the Trout Fin is not confirmed by my research as an authentic historic or heritage-style “Lake Fly,” but I believe that pattern, sent to Ray Bergman in the mid-1940′s by Bert Quimby of South Windham, Maine, for inclusion in Ray’s fourth book, With Fly, Plug, and Bait, 1947, is of Maine origin and was probably fished in lakes. So there you go. Classic logical conclusion arrived at by deduction of the facts.

These wet fly sets are actually what got me started on the path to being more or less a professional fly tier. I started selling them back in the mid-nineties when I was doing shows as an exhibitor; selling tying materials, flies, fly selections, hooks, tackle accessories, and – boxed pairs, sets of classic wet flies. Back then they were not even called “classic wet flies” because the term had not yet caught on, and I was about the only tier, or one of the few fly tiers around even tying those old “forgotten” brook trout patterns. It’s like at one time, Classic Rock music was just “rock music.” So these old “classic” wet flies were at one time, just “wet flies.”

I had sent the first set of the “Doctors” to a customer in Canada. Then I got another order just last week for a customer in Australia, which could be another story in and of itself, but suffice it to say that it’s amazing to think there are classic salmon and trout fly tiers in the land Down-Under. Bob Frandsen for one that I can think of; member of http://www.classicflytyingforum.com and TheStreamerList.com. (That reminds me of Men at Work, a favorite classic rock band from Australia. I love The Essential Men at Work, it’s one of my favorite CD’s).

So back to doctors in the house – the Silver Doctor was published in Favorite Flies and Their Histories, 1892, by Mary Orvis Marbury. Not once, not twice, but four times. The first Silver Doctor in Marbury’s book is among the Salmon Flies, then there are three different versions included on the Plates of Lake Flies, the Orvis version, and two more patterns of the Doctor, designed by Henry P. Wells, creator of the Parmacheene Belle, and J. G. Shearer. The Golden Doctor is not as well known as the Silver Doctor, but it is mentioned in Marbury’s book, dating it to the 19th century, certifying its probable use as a fancy Lake Fly pattern.

Here are some photos of the patterns:

Silver Doctor - Don Bastian pattern variation.

Silver Doctor – Don Bastian pattern variation. Dressed on a #4 Mustad 3906 vintage wet fly hook. I added the jungle cock cheek for extra appeal. The basic pattern – tail, tag, tip, body, hackles came from Trout, by Ray Bergman.

This pattern of the Silver Doctor is included in my second DVD, Advanced Classic Wet Flies, though that version has a slightly simpler five-strip wing. I got the idea for these original wing-quill versions of the Silver Doctor by examining commercially-tied Silver Doctor wet flies in The Maine Guide Fly Shop, in Greenville, Maine, about ten years ago. Those patterns were tied with duck wing quills, simply yellow and blue, married together. Up until then I had always tied the Silver Doctor using flank feathers of teal, barred wood duck in some cases, and mottled turkey or bustard, along with goose shoulder for the red, blue, and yellow. Seeing those simple quill-wing versions got me thinking; why not use more durable wing quill slips in place of the harder-to-use – not to mention grading and selecting – and less durable flank feathers? I used plain brown goose for turkey, and guinea fowl for a replacement for the black and white teal feathers. The rest was plain old goose and duck wing quill sections, readily available and easy to marry.

Here is the Golden Doctor:

Goldemn Doctor - dressed and photographed by Don Bastian. This pattern is the one taken from Trout, 1938, by Ray Bergman.

Golden Doctor – dressed and photographed by Don Bastian. The hook is a Mustad #4 vintage 3906. This pattern recipe is the one taken from Trout, 1938, by Ray Bergman.

Silver Doctor and Golden Doctor, card-mounted, boxed and labeled.

Collector’s Set – Silver Doctor and Golden Doctor, card-mounted, boxed and labeled.

Here is the link to this set of wet flies: http://www.myflies.com/Classic-Wet-Fly-Collection-Silver-and-Golden-Doctor-P837.aspx

When I was tying the Silver Doctor for the customer in Australia, I got the inspiration to change the mottled turkey in the wing to light and dark brown mottled peacock wing quill. The mottling of brown is bolder and more contrasting in the peacock feathers, and my reasoning was that it would look better. And I believe it does. All of these flies are tied with the wing tips curving downward, in popular 19th century fashion.

Here is the Silver Doctor, my latest variation:

Silver Doctor - dressed and photographed by Don Bastian.

Silver Doctor – dressed and photographed by Don Bastian. This pattern also differs from the one above in the lack of a tip; both the flat gold tinsel and red floss are part of the tag on this version. Sorry the photo is a little lackluster; I’m still having to shoot on “auto” which severely limits my options for lighting, focus, color, and depth-of-field. I may still decide to change the plain brown-dyed goose to mottled brown turkey for a little more variegation of color.

The Golden Doctor:

Golden Doctor - this version has a full collar hackle applied after the wing was mounted.

Golden Doctor – this version has a full collar hackle applied after the wing was mounted. These wing slips were cut from a matched pair of mallard flank feathers; that is a left and a right, so that the webbed fibers are balanced, left and right. Historically this pattern would have been tied with a pair of whole gray mallard flank feathers for the wing.

Golden Doctor

Thread: Danville Flymaster 6/0 #56 Red

Hook: #2 Mustad 3906, any standard wet fly hook will suffice

Tail: Red, yellow, and green goose or duck quill sections; married

Body: Flat gold tinsel

Hackle: Claret

Wing: Gray mallard with “splits” of narrow married blue and red goose shoulder

Head: Red – Wapsi lacquer was used over the red thread, and finished with a couple coats of clear Grif’s Thick

Below are both flies together on the wood:

Golden  Doctor and Silver Doctor - size #2 Mustad wet fly hooks, vintage 3906.

Golden Doctor and Silver Doctor – size #2 Mustad wet fly hooks, vintage 3906. Tied and photographed by Don Bastian.

Here are the #2 Doctors, card-mounted, labeled, and ready to be sent off to Australia; thank you Brett!

Silver Doctor and Golden Doctor - Mustad #2 vintage 3906 wet fly hooks. Tied and photographed by Don Bastian.

Silver Doctor and Golden Doctor – Mustad #2 vintage 3906 wet fly hooks. Tied and photographed by Don Bastian.

Silver Doctor

Thread: Danville Flymaster 6/0 #56 Red

Hook: Mustad 3906 wet fly hook, any standard wet fly hook will suffice

Tag: Flat gold tinsel

Tail: Golden pheasant crest and short dash of blue schlappen, or kingfisher

Tip: Red floss (see footnote differentiating tip and tag)

Ribbing: Oval silver tinsel

Body: Flat silver tinsel

Hackle: Blue fronted by guinea fowl

Wing: Brown turkey or mottled peacock, brown goose (or mottled turkey), guinea fowl, red, blue, yellow goose; married

Cheek: Jungle cock

Head: Red – this has a coat of Wapsi red lacquer, with a couple coats of clear Grif’s Thick over

The definition of tag and tip is as follows: A tag is always at the end of the body, but always behind and underneath the tail; whereas a tip is also at the end of the body but always encircles the tail. This definition is clear; taken from J. Edson Leonard’s 1950 book, Flies. However, in his own excellent Fly Nomenclature drawing, he contradicts himself by, according to his written definition, labeling part of the tag as the “tip.” The pattern in his diagram, p. 37, 1988 edition, actually has no tip. I believe my readers will appreciate this clarification.

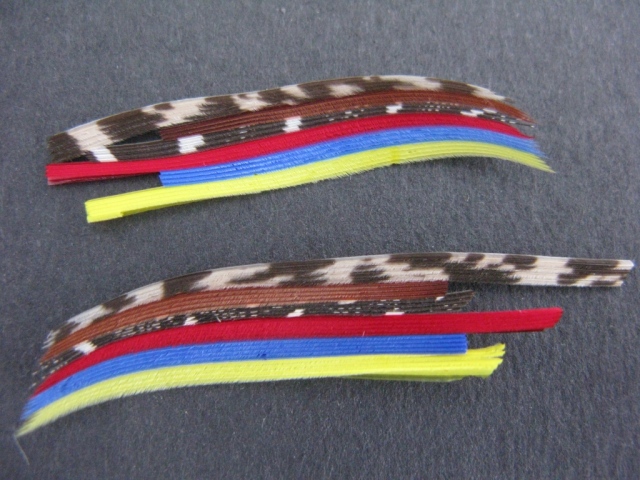
Here is a photo of the married wings before mounting; I didn’t count barbs, but figured four each was about right. The individual wings may be off a barb here and there. Two contradictory definitions can not both be correct.

Silver Doctor wings

Silver Doctor wings – married, prior to mounting on the fly.

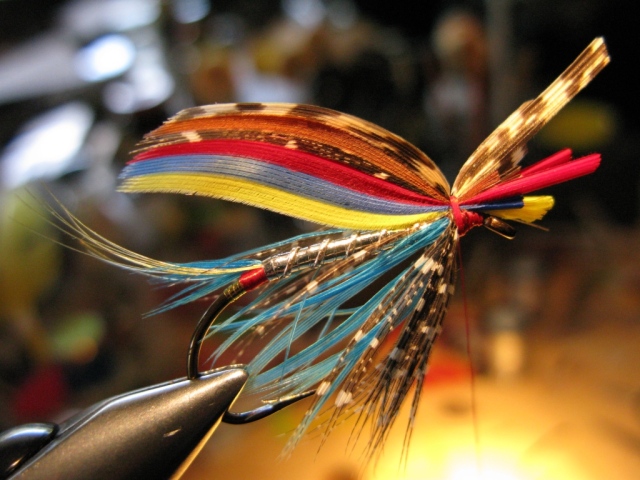
Silver Doctor wings set in place with two or three thread wraps.

Silver Doctor wings set in place with three or four thread wraps.

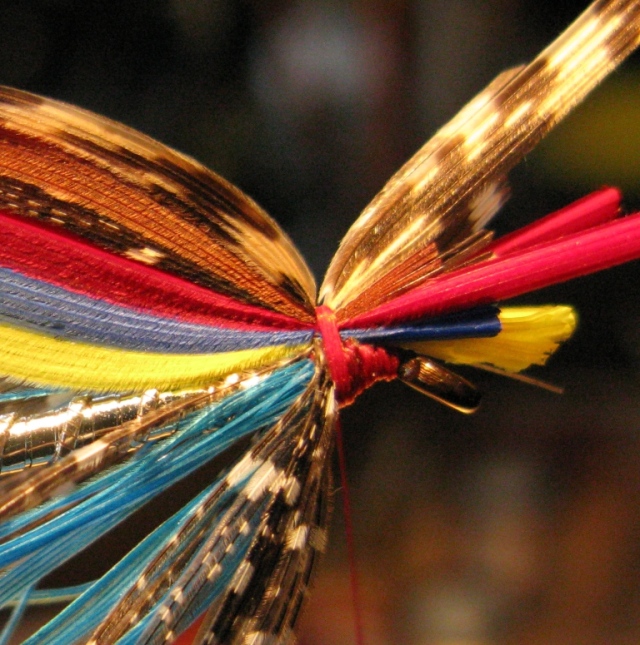
Macro-image of the wing set. Notice how the quill sections have compressed perfectly, with not fluting, pleating, or folds. Something I just learned in March of 2012. Read below for that technique.

Macro-image of the wing set. Notice how the quill sections have compressed perfectly, and they are centered on top of the hook shank, with no fluting, pleating, or folds. Something I just learned how to do in March of 2012. Read below for that technique.

I shall endeavor to explain this as succinctly as possible. However, without a photographic step-by-step, or until I can make another video, this is the best I can do. If you don’t quite get it the first time, try reading it slower a second time, and go through the motions with your hands as you read. That should do it.

At the Annual L. L. Bean Spring Fly Fishing Expo in March of 2012, my friend from York, Maine, Dave Lomasney, showed me a “new” method of mounting wet fly wings. I had met Dave just one year earlier. Since he was interested, I spent some time teaching him the basics of tying wet flies and marrying wings. In a few months Dave was turning our great wet flies (see this post in my archives):  http://donbastianwetflies.com/2012/01/02/bee-1900s-orvis-wet-fly-pattern/

In 2012 Dave came up to me as I was tying at Bean’s and announced he had discovered a new way to mount wet fly wings. I did not express too much amazement, because in typical “experienced” fly tier fashion, having tied wet flies for years, I figured there wasn’t much new under the sun. I was about to be enlightened! I’ve learned more than once not to be too stubborn and set in my ways. Most anyone who has tied a few flies can probably teach you something. Dave’s method has actually been around, but to my knowledge and surveys taken since, it was not normally used on feather wing wet flies. It may have been used by salmon fly tiers, but it was primarily developed to tie in bucktail hair wings, a small bunch at a time, the idea being to get a better grip on the hair fibers by tying in smaller bunches in stages. With bucktail, the tying thread is brought completely around the butt ends of hair, then around the hook shank, so two wraps are made over the butts before they are lashed down to the hook. So it is with the feather wing slips on wet flies.

Pinch and hold the wing in the usual position, but elevate it slightly above the hook shank as you make the first wrap, then the second thread wrap is brought underneath the butt ends of the quills, but not around the hook. Two wraps are made over the butt ends of the wing quills before you make the third wrap that takes the thread around the hook shank.

The two wraps over the wing must be made directly above the rear of the head, which is where your tie-in point would and should normally be. They must also be made in place, right on top of each other. Once the two wraps are made over the butt ends of the wing, let go of your bobbin. Then the left hand holds and only holds the wing proper (do NOT make any other motions); while the right hand grasps the butt ends of the wing and makes a slight up and down motion with the exposed butt ends. This action, combined with the gravity weight of the bobbin, relaxes and collapses the thread looped around the wing. Once this is accomplished, 50 to 75% of the wings butt ends will be compressed and collapsed down.

Next stabilize the wing with your left thumb and middle finger, holding the wing vertical, and tight (but not too tight to have the thread cut the fibers of the wing), and maybe even tilted slightly toward you; grasp your bobbin, and tighten the thread slowly, gradually bringing it to up to maximum tension, before making the third wrap. Make two more wraps at max tension, then check your wing attitude.

With practice this method will improve your wing setting by 100%. It may take a few flies and wings and some effort to get it down. And I have learned that it is particularly useful for wider wings on large hook sizes. This technique excels in setting perfect wings on #2 and #4 hooks. I use it all the way down to #8′s; on #10 and smaller it is not necessary. I dare say thank you Dave! I have used this method on virtually every size #8 and larger wet fly wing I have tied in the last year-and-a-half.

One result this method accomplishes is this: It gathers the bottom of the wing quill sections completely together, pulling them in place and centering them top-dead-center on the hook shank. It eliminates any slippage or “creep” of the bottom of the wings down over the sides of the fly body. And it virtually eliminates pleating and folding of the wing. It also ties in the wing at the exact point where the thread initially makes contact on the top of the quill sections, eliminating the forward thread-slippage that almost always occurs when setting wet fly wings with the conventional finger-pinch-wrap method. I still teach the conventional method of setting wings, but in every class I have taught since Dave showed me this trick, I teach this method more than any other. My students unanimously love it better than the old method.

Oh, and yes, I use the same method on the Golden Doctor and other flank-winged wet flies in setting the two opposing sections of gray mallard flank. Works like a charm!


Pink Lady Fan Wing Dry Fly

$
0
0

Considering my fly tying and fly fishing roots, in that I was exposed to Trout, 1938, by Ray Bergman at age 12, and also How To Tie Flies, 1940, by E. C. Gregg; these two books had a profound influence on my early interest and education in tying flies. Other than seeing my dad tie three flies, I never saw anyone else tie a fly for ten years, except my brother, Larry, since we shared dad’s tying tools and materials until he went away to college in 1972. Primarily because of those two books you could say I am a classically-trained fly tier. Similar to a musician who was classically-trained, but I have stayed closer to my traditional roots than a classically-trained musician who becomes a performer of rock or jazz. My traditional fly tying roots include stories of how the Fan Wing Royal Coachman was a favorite dry fly pattern of my father, Donald R. Bastian.

Ray Bergman wrote about the Fan Wing Royal Coachman in his books, but it was not until later in my tying career that I obtained a copy of Ray’s first book, Just Fishing, 1932. Bergman’s account in Just Fishing describes his initial revulsion at the mere appearance of the Fan Wing Royal Coachman, and then continues in the text of that book as to how and why the pattern quickly became one of his favorite dry fly patterns.

From the single color plate of dry flies in Just Fishing, painted by artist Dr. Edgar Burke, there is a Fan Wing Pink Lady. I always thought that was a beautiful fly. Over a decade ago, bowing to my classically-trained fly tying roots, I put together a boxed selection of five different Fan Wing dry fly patterns, containing, of course the Royal Coachman, plus a Light Cahill, March Brown, Green Drake, and the Pink Lady. Last season during the shows I sold the last boxed set I had, but I have had a few dozen fan wing flies completed, ready to make up a few more sets, save for tying a couple more of the patterns to complete the selections.

The Pink Lady became a well-known dry fly pattern, thanks to George M. L. LaBranche, who in 1914, authored The Dry Fly and Fast Water. LaBranche is credited for originating the Pink Lady. In the 1920′s when Fan Wing patterns became popular, it was only natural that someone would take the Pink Lady and convert it to a Fan Wing pattern.

Here is a Fan Wing Pink Lady that I tied a couple years ago:

Fan Wing Pink Lady - the hook is a size #10 standard fine wire dry fly hook.

Fan Wing Pink Lady – the hook is a size #10 standard fine wire dry fly hook. Tied and photographed by Don Bastian.

Fan Wing Pink Lady

Hook: Standard dry fly hook, size #8 to #12

Thread: Danville Flymaster 6/0 #2 Cream

Wings: White duck breast feathers, see footnote below *

Tag: Narrow flat gold tinsel

Tail: Golden pheasant tippet

Ribbing: Narrow flat gold tinsel

Body: Pink floss, pale in color

Hackle: Light ginger

Head: Cream

* Male wood duck breast feathers can be used for the white wings, though during the Golden Age of Fan Wing Drys in the 1920′s and ’30′s, wood ducks were under the protection of the Federal Migratory Bird Treaty Act of 1918. Nearly driven to the brink of extinction by loss of habitat due to intense logging and unrestricted market hunting, the extirpation of the wood duck was a definite possibility, considering the fate of the passenger pigeon. Mandarin duck feathers were used, as were also the breast feathers from small breeds of white domestic ducks. Wood ducks were fully protected starting in 1918, but some states allowed limited hunting of wood ducks to resume in the late 1940′s. ‘Woodies’ were not hunted again nationwide until 1959. Thankfully wood duck populations are presently healthy, the result of intensive duck box nesting programs and sensible hunting practices.

I apologize that I do not have a front view of the fan wings, but you can check my recent post on the Fan Wing Royal Coachman. The wings look the same. Wing sizing should be equal to the length of the entire hook. A heavier tippet, 4x, is best when fishing fan wing drys, and minimizing your false casting also works to your advantage.

I listed the wings as the first ingredient, because when tying these flies, it is advisable to mount the wings first. I believe there is feather mounting information in my Fan Wing Green Drake post. Don’t forget you can use the search key tab at the to right of my home page; just type in a topic you are looking for, and hit ‘enter.’

The Fan Wing Pink Lady is a classic dry fly pattern.


Musical Fly Tying

$
0
0

I nearly always listen to music while I am tying flies. This weekend I am continuing the work on an order of twenty-one dozen drys; four dozen each: sulfur duns and PMD duns in four styles; sizes #14, #16, #18; the boxed selections as listed on MyFlies.com: http://www.myflies.com/Sulphur-Mayfly-Duns-Four-pack-Selection-P828.aspx and the remaining twelve-plus dozen is all my Floating Caddis / Mayfly Emerger patterns in standard and custom sizes and colors. I just tied the first two – ever – of my Floating Caddis Emerger in size #20. With the Hi-Vis indicator, and a custom dark dun half-wing, that gives the pattern nine components – yeah – seriously – on a size #20 dry fly hook. They are turning out very well. I like the looks of these “Micro-Emergers” very much! I have every confidence that these little guys possess serious potential to give trout a sore mouth. I’ll do some photos of them before I ship the order; if I can, remember, for those of you following my posts regularly, I have been having camera trouble and can not shoot on Shutter Speed Priority. I’ll have to see what I can do on the still-working automatic setting.

Listening to the Best of the Corrs CD while tying those #20 “Micro-mergers” – there I just thought of a name for them – plus the fact I checked some information this morning in an older post I made last year, that had little to do with fly tying and a lot do do with music, combined with recent renewed interest in my 1970′s vintage Premier drum kit, has prompted this short break from tying to make this post. I did some editing on this archived post post this morning: http://donbastianwetflies.com/2012/08/08/flytying-music-and-singing/

Perhaps if you have time and like music, you may find it interesting. Continuing on with the renewed interest in my drum set; I got them set up properly over a month ago in late July and have been playing them periodically. In the middle of this past week, I started looking on eBay for drum accessories. Amazing volume of stuff there. I thought I would add a couple cymbals to my set. With some really good prices, I could not resist. So far I have bought, used, but in very good condition, a Zildjian A 17″ Medium Thin Crash, and a Zildjian A 15″ Thin Crash. Both cymbals are nearly in new condition, one has a “flea’bite” which is a small nick in the edge, for $140. That will do diddly to negatively effect the playability of the cymbal. The retail price of these two cymbals is nearly $400. I am also “watching” a few 14 Zildjian A 14″ Fast Crash Cymbals, within the week I’ll pick up one of those too. In addition, I also found, rather unbelievably, a 1975 Premier natural birchwood finish 16″ x 16″ floor tom-tom that is a perfect match to my set. I bought that too. Paid more for it alone than I did for my entire set in 1978, $200, bought it used back then from a local drummer who needed the cash. The new floor tom-tom will replace the old Ludwig non-matching white pearl floor tom-tom I used to use.

I also am bidding on some hardware; a Ludwig floor cymbal stand and a Ludwig boom stand. Guess I’ll be needing at least two boom stands when I get this set where I want it. I already have a 16″ Zildjian Medium Thin Crash cymbal that dates from my rocking days in the ’70′s. It’s the one on the high stand to the immediate right of the set. Here’s a photo of my Premier Drum Set:

My drum set - a vintage  Premier PD6500 Powerhouse set.

My drum set – a vintage Premier PD6500 Powerhouse drum set. The hardware is not Premier; that is all Ludwig except the stand on the far right is Rogers. The ride cymbal on the left is a vintage Zildjian from the ’60′s, and I also have a 22″ vintage 1950′s -’60′s Zildjian ride cymbal that needs a stand.

I am going to have to move the entire set out from the corner of the room a bit when I add the second floor tom-tom, and the additional cymbals and stands. I am also giving serious thought to starting a band or perhaps joining a local rock band if one should need a drummer. I haven’t played in a rock band since 1979. I can also substitute a little bit as both lead and back-up singer. Playing in a band won’t curtail my fly fishing-tying circuit that much, and there is always the possibility that due to rising costs of table fees, hotels, gas, meals, and other expenses, I’ll stop eventually doing the major Fly Fishing Shows. Just a possibility, I will have to see what transpires with my band ideas.

I’m going to sell the small 14″ Ludwig Standard cymbal on the right, and then I’ll have four Zildjian crash cymbals in order, 14″, 15″, 16″ and 17″; plus the two ride cymbals and the hi-hat. Sweet! I can’t wait!

Here is a photo of my grandsons, Gabriel and Andrew, banging it up during their visit in July:

My grandson Gabriel rocks on!

My grandson Gabriel rocks on! With some help from little brother Andrew. Are they having fun or what?!

Those boys loved those drums!

I’ll soon be making custom music CD’s loaded with all types of music that In can pipe into my family room and play along anytime I want. Listening to and playing along with my favorite songs, now, that’s great fun, relaxation, stress-relief, and entertainment. In between drumming breaks I’ll be listening to music while tying flies.


Hacklebarney Trout Unlimited Chapter Meeting

$
0
0

This coming Thursday evening, September 12th at 7:30 PM, I am presenting a program at the Hacklebarney Chapter of Trout Unlimited in Whippany, New Jersey. This is the first chapter meeting after summer vacation. I am presenting my program on Fly Fishing the Moosehead Lake Region of Maine. The public is invited. For more information and directions, please check their website: http://www.hacklebarneytu.org/

I’ll have some display flies, featuring Carrie Stevens Rangeley style streamers, some fishing flies for sale, some collectible wet flies available to purchase, along with my DVD’s. Hope to see you there!


Barnes Special Streamers – One Dozen

$
0
0

The Barnes Special is a classic Maine streamer pattern that was among six featured on my 2007 DVD, Traditional Streamers and Bucktails. http://www.myflies.com/DVD-Traditional-Streamers-and-Bucktails-P622.aspx

I recently got a custom order from MyFlies.com http://www.myflies.com/Don-Bastians-Custom-Fly-Orders-P750.aspx

for a dozen Barnes Special streamers for a fellow heading to Maine later this month. I also tied the Barnes Special for Streamers365.com. There are several archived posts here featuring the Barnes Special, (you can go to the search tab and type the name in, then hit “enter” and locate the older posts), but I thought the new and different twist with this post would be to show the completed order of a dozen streamers. And I also decided to add the photos of the completed bodies, something I generally do when tying streamers of the same pattern, make the bodies ahead of time as part of a separate production run.

Here are the bodies:

A dozen streamer hooks, sizes #4 and #6, "bodied up" ready for tcompletion of the rest of the pattern. The hooks are Gaelic Supreme Rangeley style streamers,

A dozen streamer hooks, sizes #4 and #6, “bodied up” and ready for completion of the rest of the pattern. The hooks are 8x long Gaelic Supreme Rangeley style streamers. The tail is two paired jungle cock body feathers, as ore the original recipe by C. Lowell Barnes, a Maine guide in the Sebago Lake region.

The bodies were whip finished and head cemented. Here are the dozen patterns, placed pretty much as I dropped them in preparation for insertion into plastic sleeves.

One dozen Barnes Special streamers, sizes #4 and #6.

One dozen Barnes Special streamers, sizes #4 and #6. Tied by Don Bastian.

I have posted the recipe on the archived topics with this pattern, but I have included the recipe here as well.

Barnes Special

Hook: 6x or 8x long streamer hook

Thread: Danville Flymaster 6/0 #56 Red; black or any color may be used for the bodies.

Tail: Two jungle cock body feathers, paired, just a tad over the hook gap in length

Ribbing: Oval silver tinsel

Body: Flat silver tinsel

Underwing: Sparse red bucktail followed by sparse white bucktail, to end of tail or a very short distance past tail

Wing: Two yellow hackles flanked on each side by two grizzly hackles

Hackle: White, tied as a collar

Head: Red

The heads have four coats of clear ProLak cement, though I sometimes use a single coat of Wapsi Red lacquer coated with clear lacquer. The yellow hackles were selected from a saddle and the grizzly hackles came from a cape (or neck). The tinsel body is medium sized Mylar, double-wound by starting at the head, winding back, then forward. This provides better coverage and is more durable. The white collar hackles were made from schlappen feathers, using the tip sections, chosen for proper barb length. Schlappen feathers are great for this because of their very small stem diameter and flexibility, and also the softness and webbing of the barbs. When tying this and other streamer patterns with bucktail bellies or underwings, it’s best to keep the hair sparse. Here is a macro of a single fly:

Barnes Special, size #4 - 8x long. All flies tied by and photographed by Don Bastian.

Barnes Special, size #4 – 8x long. All flies tied by and photographed by Don Bastian.

The Barnes Special is still a very popular streamer pattern in Maine. These are going to a customer in Wisconsin, who is heading to Maine later this month. I wish him luck and success with these streamers!

One final group shot, set up in nice rows:

One dozen Barnes Special streamers - sizes #4 and #6.

One dozen Barnes Special streamers – sizes #4 and #6.

Thank you for the order Scott! Tight lines on your trip!


Spring Creek Trout Unlimited Chapter Stream Project

$
0
0

This is a report on a recent stream improvement project from the Spring Creek Chapter of Trout Unlimited, based in Centre County, Pennsylvania. The Chapter recently completed this project on the lower end of Spring Creek, very near its confluence with Bald Eagle Creek at Milesburg.There will also be another project to plant trees, the information is included in this post. I took the information from an e-mail sent by Chapter Vice-president, Robert Vierck. The following is from Bob’s Chapter e-mail notice:

The construction phase of the Lower McCoy Bank Stabilization and Buffer Buddies program was completed on June 25th – on time and within budget.  This is due to all the efforts that our volunteers put into this project - really well done with great cooperation from all. Some information:

1.  We had a total of 18 volunteers on June 24, and 17 volunteers on June 25.

2.  We were able to complete 95% of the construction of the mud-sill on Monday with final rock placement this morning, (on July 3rd).

3.  We installed 5 multi-log vane deflectors using 25 ‘ logs today, (July 3rd), before we broke for lunch.

4.  A total of 160 tons of #6 Limestone rock was used to stabilize the stream between the two locations.

4.  We planted grass seed and covered it with straw.

5.  The final seeding was extremely wet as the storms came – but some valiant volunteers finished the seeding.

6.  The deflectors and mud-sill stood up very well in spite of being tested extensively by a major storm on June 27th.

Here are some of the photos from the Chapter e-mail:

Spring Creek, in I believe, the project area before work was started.

Spring Creek, at Milesburg, Pennsylvania – in the project area before work was started.

The project included a hands-on youth session.

The project included a hands-on youth session. Here a chapter member looks on as some participants “catch bugs.”

Informal session on aquatic entomology.

Informal stream side session on aquatic entomology.

Checking out that fly rod!

Checking out that fly rod grip.

Work progresses for the installation of a log vein.

Work progresses for the installation of a log vein. I believe there were also personnel from the Pennsylvania Fish and Boat Commission.

This was a very successful project. We were able to construct the longest mud-sill to date on Spring Creek, and install five multi-log vane deflectors in two-and-a-half day’s work. On July 3rd we actually watched a fly fisherman catch a nice brown trout behind a rock next to the new mud-sill.

Included here are some of the Chapter photos of the project.

More are available on our Facebook Page https://www.facebook.com/springcreektu and on the home page of our website - http://springcreektu.org/

Still working on that log vein installation...

Still working on that log vein installation…the large hand-drills are used to drill through the logs for placement of steel re-bars to anchor the logs to the stream bed.

Looking

Looking downstream toward part of the project area.

Upstream view

Upstream view at a log vein site. There is a second log vein upstream, just to the left of the utility poles on the right-hand bank, and a third one, submerged between the two.

Area of limestone rock rip-rap.

Area of limestone rock rip-rap, looking upstream from the bridge at the park in Milesburg. The ground has been seeded and mulched with straw. This will help to secure the stream bank and greatly reduce erosion. The submerged rocks also provide cover for trout and habitat for aquatic insects.

Once again, thanks to all of our volunteers.  We are now planning the planting stages….keep tuned.

October 7th & 8th our chapter will need 15 volunteers to assist in the planting of trees and shrubs in Milesburg. The in-stream work is complete. Now we need to do the planting along the bank. We will be obtaining the plants and other materials from the Western Pennsylvania Conservancy. At present we are awaiting contract approval from the landowner – FirstEnergy.  The above dates are tentative, pending approval from FirstEnergy.


To volunteer contact Bob Vierck   (vpres@springcreetu.org) or call: 814-360-3702, or e-mail Jim Lanning (jlanning@ncikrg.org)

I’d like to add that this project is great news. it is sure to enhance the fishing in this section of stream. In fact the last several years have seen good developments for Spring Creek and increased and enhanced angling opportunities. In 2007 the old McCoy dam below Bellefonte was removed, and the Spring Creek Trout Unlimited Chapter and PA Fish and Boat Commission work installed log veins and stream improvement devices in that section. The dam removal opened up to fishing a new stretch of about one-quarter mile that was formerly inundated with water. The McCoy dam had been in place since the late 1700′s. The three-mile stretch of Spring Creek between Bellefonte and Milesburg is a great summer fishing location. Even in the hottest weather the water temperature seldom exceeds sixty degrees in this stretch because of the influx of cold water from the big spring in down town Bellefonte.

The PA Fish and Boat Commission also opened to wading the upper section of Fisherman’s Paradise, just two years ago. This is above the park area and upper parking lot where the grass in mowed. This section was always difficult to fish because of the trees, brush, and no wading law. Additionally the Pennsylvania State Correctional Institute at Rockview opened up the formerly closed to trespassing “canyon” stretch of Spring Creek between the Paradise and Benner Springs. Finally, a formerly closed-to-fishing section in downtown Bellefonte was also opened to fishing. The new water is between the High Street and Lamb Street bridges, if you don’t mind fishing “in town.” In all, these combined changes have added almost a mile of “new” fishing water to Spring Creek. And the entire section of open, accessible water on Spring Creek is all Catch-and-Release. It is one of the best wild brown trout fisheries in the state of Pennsylvania. Give it a try!


The Liar’s Bench at The Angler’s Nook, Shushan, New York

$
0
0

I received a fly order through http://www.myflies.com from a customer in Delaware last month. Our back-and-forth e-mail correspondence eventually turned his initial dozen-and-a-half order for my Floating Caddis / Mayfly Emerger into a very nice order, as he kept adding more patterns until his order reached ten dozen, including some sulfur Comparaduns and Thorax Duns, and a few dozen of a pattern by Jim Slattery, originator of the Stimulator, called the Triple Threat Caddis. Here’s a link to Fly Angler’s On Line with that pattern: http://www.flyanglersonline.com/flytying/fotw2/091304fotw.php

The TTC, as I call it, while I’ve never fished it, looks like a great pattern. I’m definitely going to tie some up for my personal fly box. And I had fun tying it. I did them for my customer in tan with orange thread as the FAOL article suggests, a ginger-brown version, and olive. Anyway, to The Liar’s Bench at the Angler’s Nook. My customer in Delaware and I have been in contact and he has sent me some photos. One from earlier this past week caught my attention because of the names painted on the wall. This was all new to me, but I recognized a couple names in the photograph. Investigation that I’ve done led me to this post on Sparse Gray Matter: http://www.sparsegreymatter.com/viewtopic.php?f=10&t=1421

Here is why this simple contact for a fly order morphed and grew into a fascinating bit of fly fishing nostalgia. The photo sent to me by my customer in Delaware is something that I have not been able to find on line, that is, a photograph of The Liar’s Bench at The Angler’s Nook, which was George Schlotter’s fly shop in Shushan, New York. Two names jumped out at me: Lew Oatman, who lived in Shushan, creator of numerous baitfish streamer imitations, including one of my all-time favorite streamer fly patterns – the Brook Trout, sometimes called the Little Brook Trout, and John Atherton. Here is a link to the Brook Trout tied by Chris Del Plato, along with several of Lew Oatman’s other original patterns. https://sites.google.com/site/cdelplato/lewoatmanpatterns

John Atherton, 1900-1952, is the author of The Fly and the Fish, published in 1951. Here is a link to a site with detailed information about John Atherton: http://www.sullivangoss.com/john_Atherton/

Atherton was a very talented artist as well as a fly tier, angler, and author. I encourage you to read the information about his life, it is fascinating. One of his famous award-winning paintings, The Black Horse, hangs in the Metropolitan Museum of Art in New York. John Atherton had more than one-hundred covers published on The Saturday Evening Post.

Here is the photo sent to me by my customer in Delaware. He and his family visited there and he fished the Battenkill River as a young man. The photo was taken in the 1970′s. Don’t forget folks, you can click your mouse on the image to view an enlarged version.

The Battenkill - The Angler's Nook Liar's Bench

The Battenkill – The Angler’s Nook – Liar’s Bench. Photo courtesy of Richard Gordon. Chris Del Plato informed me that Al Prindle was the Shushan Postmaster, for whom Lew Oatman’s pattern of the same name was created.

The remaining names on the bench did not turn up anything on a google search, but I only checked the first page that came up. I’m sure there are some folks who might be familiar with them. Possibly author Mike Valla, who spent some time in The Angler’s Nook, can shed some light on the remaining names. I am very pleased that my customer gave his permission to post this photo. As I noted, I failed to find a single image of this particular Liar’s Bench. Most of them led to various bars and pubs across the country with this name. Thank you Richard, for sending the photo. This is an incredible bit of fly fishing history for the Vermont – New York area.

An edit with additional information: The comment below posted by Chris Del Plato corrected my original statement (edited above to reflect the correct info) that Lew was the postmaster in Shushan. Chris informed me that Al Prindle was the Shushan Postmaster. If I had looked this up in Joseph Bates Streamer Fly Tying and Fishing, 1950, 1966, 1996, I would have read this: “This bucktail (Shushan Postmaster) was originated by Lew Oatman of Shushan, New York, about 1953 and named for the postmaster of the town (Al Prindle), who was one of Lew’s favorite fishing companions on the Battenkill River, which flows from Vermont into New York state.” Thanks Chris!

Additionally, I found a photo of a Normal Rockwell cover painting from The Saturday Evening Post. Subsequent research that I did, again sparked by information provided by Chris Del Plato, led me to discover that Al Prindle was the subject of at least two Normal Rockwell paintings. This one is titled “Catching the Big One” though I read online that the original title was “Fishing Lesson.” It was the cover of The Saturday Evening Post in on August 3, 1929.

Catching the Big One - painting by Norman Rockwell. This was originally titled Fishing Lesson. Al Prindle,the postmaster in Shushan, New York, for whom Lew Oatman's Sunshan Postmaster fly was named, was the subject for the painting.

“Catching the Big One” – painting by Norman Rockwell. This was originally titled “Fishing Lesson.” Al Prindle, the postmaster in Shushan, New York, for whom Lew Oatman’s Shushan Postmaster fly was named, was the subject for the painting. This photo came from http://www.rockwellplates.com.


Mustang Sally

$
0
0

I have been wanting to notify everyone of a situation affecting my blog. I mentioned a while back that I was having some technical, electronic problem with my camera. It was still working, but the selective shutter and exposure options were somehow compromised and worked intermittently at best. I was, at times, stirred up enough to be tempted to perform some percussive maintenance on it, you know, whack it with a hammer to “get it going again.” Sometimes that works, like in The Empire Strikes Back, when Han Solo whams his fist against a bulkhead in the Millenium Falcon, which gets the engines going after a faltering start.

Early last week I completed an order of a half dozen #4 Cheney Bass Flies and a half dozen #6 and #8 Puffer Trout Flies. Both of these flies are historic patterns dating from the 1800′s. The customer happens to own an antique brass-faced Hardy Perfect reel with A. N. Cheney’s name engraved on it, hence his interest in these two particular patterns. The accounts of Cheney’s connections to these flies is recorded in Favorite Flies and Their Histories, 1892, by Mary Orvis Marbury, pp. 349-350, and 402. Eventually I’ll do that post, combining photos of these patterns along with Cheney’s old Hardy reel owned by my customer. In the meantime I’m ordering a new camera.

Here is what happened to throw a wrench in the works: When I was getting ready to photograph the flies, I placed my Canon G9 camera on the edge of a TV tray (that’s my high-tech studio set-up photo image platform), and walked away. THUD! I turned around and the camera was on the hardwood floor. I picked it up and set it back on the TV tray, really thinking nothing of it. I mean, it only fell a little over two feet. Then I went about doing something else for a few minutes. When I turned the camera on, the lens extended, but I had no image on the view screen. Then it beeped like never before, next I got this message on the screen: “Lens error. Restart camera.” Which I did. Multiple times, to no avail. The lens would not retract when I turned it on and off. I took the battery in and out a few times. I even tried a little percussive maintenance to get it going again, to no avail. So apparently my camera is history.

Mustang Sally – a great song written and recorded in 1965 by Mack Rice. Course, we all know Mustang Sally gained greater popularity in 1966 in the single release by Wilson Pickett and on his album, The Wicked Pickett. Besides being a fly tier, I’m also a musician and I’m into music trivia. Here’s more interesting info from Wikipedia: http://en.wikipedia.org/wiki/Mustang_Sally_%28song%29

Here is a great black and white, 1960′s TV video version of Wilson Pickett performing Mustang Sally live:  http://www.youtube.com/watch?v=kfuHgzu1Cjg

It’s authentic and live alright, one of the horns is occasionally a tad out of tune, and there’s even a short trumpet mistake note at the end. Why Mustang Sally? Well, I wanted to write something to let everyone know why there has not been any new photo posts here recently, and why there won’t be for a little while longer yet. Though I do have some archived photos. Now I get to the point.

Combining the recent post about my renewed interest in playing and upgrading my drum set; I went to a local bar last Sunday evening, called The Crippled Bear. They have a covered outdoor pavilion and have bands every Sunday night, all summer long, until the end of September. A local classic rock band called Flipside was playing. I had seen them a month ago at the same place and enjoyed them very much. I knew some of the members from local 1960′s bands when I started playing in a band with my brother, Larry, in junior and senior high school. A connection here between fly tying and playing drums is that I started doing both at about the same time in my life, 1964, in the summer after my fifth grade year. I knew the drummer in Flipside, though after not seeing him for thirty-four years I had to tell him who I was after I said, “Hi, Mike,” and after his courteous reply with no reaction to me, I then asked, “You don’t remember me do you?”

“No.” He replied. When I announced my name, it was a typical hearty handshake and greeting that one would expect after years of not seeing one another. At the end of a brief conversation, he asked, “You wanna play?”

I answered, “Yeah, if you don’t mind, that’d be kinda cool!” We made arrangements for me to do Mustang Sally, since he sings the lead on that and could front the band on the vocal. There were a few of my friends there, but I didn’t tell anyone in advance. They called me up in the middle of the third set, at which point in the evening most of the patrons were, shall we say, really enjoying themselves. It was great! The front man counted us off, and Mustang Sally came to life. Took me a verse to get into the groove and settle into a relaxed mode of playing, but it was wonderful to play in front of a crowd again! The acoustic guitarist took me under his wing and cued me to the breaks, they more or less follow The Commitments version on that aspect, which was a good thing since I never performed that song in my life. Though as a drummer, back in the day, all I ever did to learn a song was to keep listening to it. The performance comes when you sit down at the drum set. There were no horns, but the keyboard player used the digitized note settings to fill them in. With double lead guitars, a hot lead guitar solo was inserted in the middle of the song for an entire verse. The dance floor was full, the band was good, and it was really fun! After the break, the keyboard / guitarist / lead vocalist / bandleader told me I did a good job and would be welcome to sit in anytime. Most likely I’ll be looking up their playing schedule and take them up on it.


Tricos and Baetis on Spring Creek

$
0
0

Yesterday my neighbor, Jim, and I went fishing on Spring Creek, Centre County, Pennsylvania. This was a prearranged trip through a customer who lives near Altoona. His name is Bruce; he’s bought my DVD’s, commented here on the blog, and recently bought a set of seven color variations of samples of my Floating Caddis / Mayfly Emerger, along with the recipes and instructions. Bruce and I have been in e-mail contact for the past seven or eight years. We started planning this trip about three weeks ago.

I have not yet received my new camera, and I could just simply forget about this, but I wanted to write a review of the trip yesterday, so I’ll make an effort to paint pictures with words.

A fourth companion, Ed, who used to own a rod making company in Beech Creek, also joined us. I’ve known Ed since the 1980′s; he used to display and sell at the Susquehanna Chapter Trout Unlimited Annual Outdoor Show. We’ve seen each other on occasion in recent years at the Fly Fishing Show in Somerset, New Jersey. Unfortunately Ed has some health issues that prevent him from fishing, but he wanted to come along and offered to cook lunch for everyone. About that, “Such a deal!” my wife Lou Anne, would always say. We met at the bridge at the park in Milesburg at 9:30.

The Fishing:

There was heavy fog in the area, though I had worn my sunglasses for the drive down. The water flow was low, but the stream is larger in that section, so there was plenty of water. We rigged up and dispersed, staying relatively close together. I wanted to fish the section below the bridge that is normally rough and tumble riffs and white water, and pretty difficult to fish and wade in early season. I had tied a #20 Flashback Pheasant Tail nymph on a twelve or so foot leader, to a 5x tippet, one #4 split shot, and to start, about two feet under an indicator. Second cast, “Fish on!” Fifth cast, after lowering the fly another foot to fish the slightly deeper water beyond where I took the first trout, “Fish on!” With nymphing, most anglers would simply keep casting. I learned and have always believed and taught my students over the years that an indicator should be one that is easily moveable, because a cast with set rigging in one place may not be correctly set up for making another cast even two feet away from the previously fished drift lane. Effective nymph fishing is all about versatility and constant observation, making necessary adjustments to your rig so that your presentation is correct for every location you fish. Rigging adjustments of the indicator placement also includes adding or removing split shot. I constantly make adjustments in my rig, changing patterns far less frequently than making other adjustments of weight and indicator placement.

Jim fished the junction pool with Bald Eagle Creek and took one fish swinging a #16 winged wet fly, not sure of the pattern; it was basically a Ginger Quill, but had a brown hackle and dark quill body. After two trout in the first three minutes, I over-confidently thought I was going to kill ‘em. Wrong. I fished hard, thoroughly working the seams, riffs, and runs all the way to the mouth, for more than an hour, with nary another strike. I motioned to Jim that I was going to head back upstream. I entered and fished first pool below the bridge with the same nymph.

After a little while, Jim came up and I commented that I was starting to see a few small bugs in the air. The number of these insects steadily increased in minutes. I thought they were Tricos, but I couldn’t see the tails. Guess it was just the lighting, or perhaps my need for new glasses. Jim finally caught one and positively identified them as Trico spinners. No trout were rising, and it was about eleven-thirty. I decided since the nymphing had been fruitless, that I would prepare for the hoped-for trico spinner fall and rise of trout. So I added 6x tippet, rummaged through my fly boxes and tied on a #22 Trico Spinner in anticipation of some surface action. That paid off. The heaviest part of the rise probably occurred after we departed for lunch, but I managed to take two trout that I saw rising, stung a third, and had three more rise and miss the fly. When Jim arrived, having hooked a couple fish, we gathered Bruce, who had landed six, from upstream and headed for our lunch rendezvous with Ed at Fisherman’s Paradise.

Lunch:

When we pulled in, Ed had the grill smoking. Nice! This was indeed, such a deal! Ed had thick, juicy elk burgers sizzling away, with the addition of hickory chips to the fire. Added to this were sliced whole wheat buns, a jar of Ed’s home-canned hot peppers, sliced, garden-fresh tomatoes, big, but nice and thin, sweet onion slices, a bag of chips that Bruce brought, plus a batch of home-made potato salad from yours truly. I included the recipe at the end of this post, for anyone interested. It’s pretty good.

Our picnic table was right beside the stream. As we enjoyed our lunch, we saw a mature bald eagle soaring high overhead. We also saw a huge congregation of Trico spinners in the air, thirty to forty feet above the water. I started watching for rises as we concluded our meal. When we were done eating, we put a few things away, and then I saw it: a rise! When I saw another, I said, “I’m gonna make a few casts; heck I still have that Trico spinner on my leader.” This particular Trico Spinner pattern is simple:

Trico Spinner

Hook: Straight-eye dry, #20 – #24.

Tail: Three fibers of light dun Microfibetts, divided with thread

Abdomen: White Uni-thread 8/0, started at thorax, wound back, divide the tail, then forward so the body is two layers

Wing: Sparse white E. P. Fibers

Thorax: Black Rabbit dubbing

Retrieving my rod from the car, which by the way, was a nine-foot, five-weight with a six weight line – way too heavy for low-water fall fishing in most people’s minds – more on that later; I walked over, stood at the water’s edge, since wading is prohibited in this area, and started casting and observing. I had a small audience by now, another fellow had joined Ed, Jim, and Bruce. Working the first trout I saw rising, he came up with a nice swirl, but missed the fly. A minute or so later, I hooked the first one. I landed and released that one, and I rose and stung a second trout in short order. Even though there really was not a major rise in process, Jim commented, “These fish must be looking for those spinners.” Surely, Jim was correct; the trout have had Trico spinners on the daily menu for a few weeks already. Trico hatch number two in the fall begins fifty-nine days following the emergence and mating of the first Tricos in July.

A few minutes after my first trout, I hooked and landed another. I rose two more, then Bruce asked, “Where are we gonna fish this afternoon?”

“We can go below Bellefonte if you want to,” I replied. We made arrangements to go downstream, below town, just below the entry of a small tributary named Buffalo Run.

The Afternoon Fishing:

We parked our vehicles and got out. I spent the first half-hour sitting and talking with Ed on a convenient stream-side bench, catching up on things, watching the water for rises. Saw none. Bruce hooked a couple trout on nymphs at the head of the pool. After a while, I started fishing with that Trico spinner anyway, thinking I might interest a fish or two. I know, using a Trico as an attractor or search pattern isn’t high on most angler’s list of regular tactics, but that’s what I did. To no avail. Jim hooked a trout or two on nymphs.

After about an hour, Ed departed and the three of us walked downstream to the old bridge abutment near the sewage treatment plant. By then I figured if I was going to catch any more fish, I better rig up with nymphs again. So I did. I tried a pink San Juan Worm, but in a few minutes lost the whole rig on brush that hung out from the bridge abutment. When I re-rigged, I put the same fly on, but in wine color. Hooked a nice, acrobatic rainbow about thirteen inches in length, who stayed on long enough to give me some action, complete with a couple jumps. Then he got off, saving me the trouble of getting my hands wet. About 4:40 PM Jim and I decided to head upstream, to catch up with Bruce who had started fishing his way upstream a half-hour or so earlier. He had not done a thing. The three of us were ready to call it a day.

The Finale:

When we got below the long, flat pool above an island, we saw rises. Quite a few of them, stretched out over a couple hundred feet of the length of the pool. Bruce asked, “What do you think they’re takin’?”

“My best guess is blue-wing olives,” I replied. “The light is less intense, we’ve had a bit of cloud cover this afternoon, and they’re the bug in season,” I added. We decided we could not walk away from this potentially entertaining opportunity. We went along the railroad tracks some distance, to a spot just below the middle of the pool, and I sat down to detach my nymph rig. Removing shot, indicator, and nymph, I tied on a section of 6x tippet, and then knotted a dark-bodied BWO Thorax Dun pattern, #20 to the tippet. The wing was gray E. P Fibers with a dark dun hackle, clipped on the bottom.

Bruce entered the water below some rising fish. I chose to stay on the bank, kneeling or sitting as I targeted some rising trout close to shore. After some futile attempts at these fish, which were in very shallow water, I decided to move upstream, above Bruce, where the water was deeper, hoping for better luck. Here’s where my nine-foot, five-weight rod with six-weight line came in handy again. Some of the trout were rising against the far side. The railroad tracks were behind us, so there was unlimited back casting room. Unlike Jim and Bruce, I stayed on the bank. Working a few trout, soon I hooked and landed one in the middle of the stream. Eventually I was targeting the trout rising along the far side. The nice thing about the heavier rod and line: I could pick up the entire line, make one back cast, and one stroke forward – and be right back on target. No stripping, no unnecessary false casting, no having to reset my accuracy and distance to the target. This tactic makes for more effective and more efficient fishing, simply because your fly spends more time on the water and less time in the air. And this was possible with the heavier rod and line, despite the fact that I was making fifty-to-sixty foot casts. I learned that earlier last year one day on Spring Creek in the Paradise, when the wind was gusty and brisk. My companions (all using three and four weights) wondered how I could cast so easily in the wind, even to rising trout against the opposite bank. Remember too, that with the addition of a couple feet of 6x tippet, my leader was probably fourteen feet long. I hooked and landed two fish, lost another one, and had four more miss the fly. Bruce and Jim each took fish as well, we were all using various BWO dry patterns. What a great way to close the day of a fine fishing trip!

When we returned to our cars, as we were taking our boots and waders off, Bruce got a cellphone call from Ed. He had gone to Fly Fisher’s Paradise Fly Shop in State College. The fishing report from every angler coming into the shop was: everyone was skunked. And Bruce questioned again Ed to make sure, there were no reports of other anglers taking any trout that day. That made us all feel even better. It’s especially rewarding to be able to catch trout under adverse conditions and circumstances. The best part of the day was not the fishing, it was the camaraderie, the great lunch, and the promise among us all to do it again.

Potato Salad Recipe:

My wife, Lou Anne, made potato salad from a recipe. And it was really good, heavily spiced with crushed dill. But I seldom use a recipe for most of my cooking, unless I’m preparing a dish where exacting recipe components and quantities are necessary. When I make potato salad, macaroni salad, pasta salad, etc., depending on how much I make, I always estimate or “eyeball” the amount of the spices, seasonings, and dressing.

This can be made in as small or as large of a batch as you desire, from a few servings, or perhaps where some leftovers are desired, to a large casserole dish for a family or church picnic.

Use any kind of potato. It’s even OK to mix varieties, a few red skinned taters add color. Three to ten potatoes will make a small to a large batch, depending on the size of your taters. Wash them of course, but I do not peel them. Dice into bite-size pieces. Cook 10 to 11 minutes. You can taste if you like. They’ve got to be done, but not Al dente, nor do you want them mushy. Drain. Use two to four hard-boiled eggs.

1/2 to a whole white or sweet onion (more for a larger batch), diced, red onion may also be used

Two to three stalks celery (more for a larger batch), diced

I like to saute` my onions and celery in butter or light olive oil until they begin to caramelize. These are added to the cooked potatoes. If you want to skip this step, simply pour the hot potatoes on top of the diced celery and onion in a dish and leave at room temperature. The heat from the potatoes will soften the onions and celery somewhat, but I prefer the added flavor from the caramelized vegetables.

Seasonings to taste:

Primarily you’ll need mayonnaise, 1/2 to 1-1/2 cups, depending on the size of your batch. It’s best to add some gradually and mix it in, then you can usually see if more is needed. I don’t like soppy potato salad.

Additionally you’ll need: Salt, pepper, crushed dill, garlic powder (not garlic salt which is mostly salt!), or garlic and rosemary ground mix, and paprika. A little rosemary by itself is also good. I also add one to three tablespoons of vinegar, sometimes adding and mixing it to a small bit of Italian dressing, like when the bottle is about empty. Pout the whole blend over the salad, I generally do this before adding the mayo. Also, a little mustard can be added, either yellow, Djion, spicy brown, or a horseradish mustard. Another nice variation is to add some blue cheese crumbles to the potato salad. I dice my eggs and mix them throughout, but one could also slice them and arrange them on top. Paprika sprinkled on the finished salad is a nice touch. The same basic recipe can be used for macaroni salad. You can eat it fresh made, but it’s always better after it has had time to steep in the fridge. Enjoy!


Slate Drakes – aka “Isonychias”

$
0
0

Fall fishing is a time of year when aquatic insect activity is minimal compared to the spring hatches. Therefore any hatch activity at all is usually met with anticipation and eagerness by the trout. Oftentimes windy weather and or rain will dislodge terrestrials from trees and bank-side vegetation; these include inchworms, ants, beetles, crickets, grasshoppers, bees, caterpillars, and spiders. This activity can be sporadic, heavier at some times than others from resulting conditions; consequently autumn dry fly fishing with terrestrial patterns can be effective. Beetles, ants, and my original Floating Inchworm pattern are my fall favorite terrestrial patterns. Among the buffet of terrestrial activity, there are still a few aquatic insect fall hatches that we anglers can take advantage of. One of my favorite mayflies in the spring, the Slate Drake, or Isonychia bicolor, also begins to emerge in the fall as the second brood of this species begins to hatch in mid-to-late September. Common in the Eastern United States on freestone waters, Slate Drakes can run almost to the end of October, often providing a near-exclusive aquatic insect match-the-hatch, dry fly fishing opportunity.

Floating Inchworm - extended body designed and tied by Don Bastian. The hook is a #16 Tiemco 2488, short shank,wide gape. This is a great fall terrestrial searching pattern.

Floating Inchworm – extended body designed and tied by Don Bastian. The hook is a #16 Tiemco 2488, short shank, wide gape. This is a great fall terrestrial searching pattern.

The first hatches of Isonychia bicolor in spring begin as early as mid-may and continue through July, sometimes sporadically, but there can be periods when these large, dark, slate-and-brown colored mayflies emerge in fairly heavy numbers, inciting trout to feed vigorously on the emergers and duns. The Slate Drake Spinner is also a significant element of this hatch and should not be overlooked. Typically these nymphs migrate to the shallows, but the nymphs living in large streams and rivers far from shore simply emerge from the water when their hatch time is ready.

A Slate Drake dry fly pattern in various styles is a good dry fly searching pattern whenever they are in season, but they are especially good in the fall when competition from other hatches is not as intense as the spring and early summer. Some traditional Slate Drake dun patterns include the White-gloved Howdy and Dun Variant. I like my BXB (Bastian Extended Body) Slate Drake Thorax Dun, Parachute, and Spinner patterns better than any other pattern style for this hatch. I’ve been fishing these patterns for nine years with wonderful success. Below is a photo of my BXB Slate Drake Thorax Dun pattern, still wet after it was removed from the jaw of an eighteen-inch brown that confidently took it on Big Pine Creek in May of 2012.

BXB Slate Drake Thorax Dun pattern. The hook is a size #14 but the fly is actually what would normally be considered a #8 or #10.

BXB Slate Drake Thorax Dun pattern. The hook is a size #14 but the fly is actually what would normally be considered a #8 or #10. The length of the pattern not including the tails is a good 3/4″ to 7/8″ in length. This fly was knotted to 4x tippet because I was fishing a fairly heavy riffle section, and I expected to encounter big trout. I did!

And here is a photo of that trout:

18-inch brown trout taken on my Extended Body Slate Drake Thorax Dun pattern, Big Pine Creek, May 2012.

18-inch brown trout taken on my Extended Body Slate Drake Thorax Dun pattern, Big Pine Creek, May 2012.

Here is a nineteen-inch brown I took fifteen minutes after the fish shown above:

19-inch brown taken on Big Pine Creek,May 2012, on my Slate Drake Thorax Dun pattern.

19-inch brown taken on Big Pine Creek, May 2012, on my BXB Slate Drake Thorax Dun pattern.

This article started off with the intention that it would be only about Slate Drake nymphs, but it obviously morphed into a work to also include dry fly patterns. These insects are large, often requiring size #8 hooks. That size may sound too large to some anglers, but if you consider the actual body length of a Slate Drake dun and compare it to the shank length of a standard dry fly hook, that’s what you would need to use. Too many fly anglers dislike large drys; they don’t know what they are missing by not using them. Large imitative or attractor dry fly patterns like the Fan Wing Royal Coachman or Royal Wulff can really stir up some excitement on the water. I’ve read the words of some writers who say that the fall Slate Drakes are as small as a size #14, but I personally have never seen a Slate Drake that small in my life. I would not tie this pattern smaller than a size #12 standard hook length for fall fishing, and I have full confidence fishing my large extended body patterns that imitate the spring hatches of the Slate Drake. Though I generally dress them on a #14 Tiemco 2488 hook, these flies are the equivalent size compared to a standard dry fly pattern in a size #8 or #10. Some of the same line of thinking by other fly tiers and anglers expresses surprise at my devotion to size #14 Sulfur patterns for Spring Creek, when most other anglers fish #16’s. Heck, I’m just imitating the actual size of the bugs I see on the water. And it’s not that #16 Sulfur dry flies don’t take trout, but a larger fly is easier to see under most conditions, and floats better. Most importantly, it works!

Here are two similar Slate Drake nymph patterns; the first one was tied by my friend Bill Shuck, of Jarretsville, Maryland. Below that are photos of the same pattern that I tied. Bill made a couple modifications because he did not possess all the same materials that my recipe calls for.

This is essentially the Slate Drake nymph pattern conceived by my friend Dave Rothrock, but I made a few modifications to it in the interest of making it tie easier and faster.

Slate Drake Nymph - tied and photographed by Bill Shuck.

Slate Drake Nymph – tied and photographed by Bill Shuck.

Here’s a side view:

Side-view - note the bulge of the wingcase proflie

Side-view – note the bulge of the wing case profile. This is Dave Rothrock’s pattern design, with some tying modifications, but the use of poly yarn for the wing case is Dave’s accurate material usage to simulate the natural high wing-case profile of the Isonychia nymphs. This imitative design is a “strike-trigger” to the trout. Tied and photographed by Bill Shuck.

Isonychia / Slate Drake Nymph – Bill Shuck version

Here is Bill’s list of materials in order of tie-in::

Hook: Daiichi 1760, Size #10
Thread: Uni-Thread 6/0, black
Tail: Three natural grey ostrich herl strands, trimmed short
Rib: Pearsall's Gossamer silk thread, brown, doubled and twisted
Median stripe: Uni-Thread 6/0, white, doubled and twisted
Over Back: Medallion sheeting, dark dun
Abdomen: Blend of hare's fur, 50% claret/25% brown/25% black
Wing case: Black poly yarn, two strands
Thorax: Same dubbing as abdomen
Legs: Badger hen cape feather barbs

Bill wrote me in his e-mail with the recipe: “All typed out like that it seems like too much stuff to
bother with, eh?”
To which I replied, “Not when you consider how well this pattern works. The extra tying time 
pays off."

Today, Monday morning, two days after I initially published this article, Bill sent me another 
Isonychia nymph pattern, this is the same fly with the addition of a single strand of natural ostrich
herl wound as a rib. 
Isonychia nymph variation - tied with natural gray ostrich herl gills. Tied and photographed by Bill Shuck.

Isonychia nymph variation – dressed with natural gray ostrich herl gills. Tied and photographed by Bill Shuck.

Slate Drake Nymph - tied and photographed by Don Bastian.
Slate Drake Nymph – tied and photographed by Don Bastian.
Slate Drake Nymph - top view

Slate Drake Nymph #10 – 2x long – top view. Tied and photographed by Don Bastian.

Isonychia / Slate Drake Nymph – Don Bastian version

Hook: #10 - 2x long nymph hook, or 3x long TMC 200R or Dai-Riki 270
Thread: Danville Flymaster 6/0 #100 Black, or #73 Dark Brown
Tail: Three fibers of natural ostrich herl
Median Stripe: Danville Flymaster 6/0 #1 White
Ribbing: One strand of Uni-thread 6/0 Dark Brown
Overback: Black scud back 1/8”
Abdomen: Haretron Dubbing #16 Dark Brown
Gills: Abdominal dubbing picked out and trimmed parallel to body.
Wingcase: Black polypropylene yarn, two strands
Thorax: Haretron #16 Dark Brown
Legs: Natural mottled hen back, short and sparse
Head: Black
The main design of this pattern goes to my friend, Dave Rothrock, guide, and fly tier, from Jersey 
Shore, Pennsylvania. He uses a stripped cream hackle feather for the median stripe; the use of
thread is obviously a huge time-saver. I also use ostrich herl strands from anywhere along the 
stem, Dave uses only the tips, which are limited in number on any feather or bundle of ostrich
herl. I can make several sets of tails from just three strands of ostrich. I cut the tips at an angle with
my scissors, trimming only the outside edge of the barbs.

I also chose to change the dubbing to Haretron; my reason is that the increased density of fine fibers – 
under fur and the Antron – makes it easier to pick out the gills. Dave’s use of poly yarn for the wing 
case is a stroke of genius in imitative pattern design. Its bulk simulates the natural profile of the live
nymphs. This is a trigger-point for the trout and significantly contributes to the inducement of strikes,
if not being the primary reason that trout take this pattern with voracity.
Below is a photo of my Slate Drake Parachute Dun:
Don Bastian's BXB Slate Drake Parachute Dun.

Don Bastian’s BXB Slate Drake Parachute Dun.

Any of these pattern can be ordered by visiting my product pages at MyFlies.com: http://www.myflies.com/BXB-Slate-Drake-Set-P741.aspx

or the Slate Drake Nymphs may be ordered by visiting my Custom Order page: http://www.myflies.com/Don-Bastians-Custom-Fly-Orders-P750.aspx

If you get a chance to venture out for some fall fishing, most streams in the Eastern United States have Isonychia populations – be prepared, and have some of these patterns to fish with.

I meant to include these photos yesterday when I wrote this post…the wordpress format was having “issues,” giving me technical difficulties, and I forgot. Here is a soft-hackle Slate Drake Flymph tied and photographed by Bill Shuck:

Isonychia Flymph - tied and photographed by Bill Shuck.

Isonychia Flymph – tied and photographed by Bill Shuck.

Here is the recipe for this pattern:

Isonychia / Slate Drake Flymph

From Bill: “This was a pattern that I posted on the Flymphforum in April 2012. The vintage hook is one given to me be a friend in Virginia, and the European hare dubbing was dyed by another friend who lives in Holland, the same guy I hosted for two weeks this past spring and who gave me an excellent 5 wt. bamboo rod he made himself.

Hook: Vintage Mustad 3913B. Size #12

Thread: Pearsall’s Gossamer silk thread, #14 claret

Hackle: Medium dun hen saddle

Tail: Three moose body hairs

Body: European hare dyed claret, spun in a dubbing brush with claret silk thread

Nice that you got a bamboo rod for hosting your friend! Such a deal!

I close this with image of a half-dozen Slate Drake Nymphs:

Slate Drake Nymphs, tied and photographed by Don Bastian.

Slate Drake Nymphs, tied and photographed by Don Bastian.

And one final shot, lined up in a row:

#10 3x long Isonychia - Slate Drake Nymphs. Tied and photographed by Don Bastian.

#10 – 3x long Isonychia – Slate Drake Nymphs. Tied and photographed by Don Bastian. These are dressed on Montana Fly Company Curved shank straight eye nymph hooks, #7002 Stimulator Hook.


Fishin’ Report

$
0
0

Despite the less than favorable weather patterns lately, specifically referring to a general lack of rainfall and low water conditions, I thought I would present some information that might just spark your interest enough to plan a fall fishin’ trip.

Most streams in this part of Pennsylvania are experiencing low water levels, however there are a couple exceptions. The two locations I want to point out are Big Pine Creek in Lycoming County, and Penn’s Creek. Back over Labor Day weekend, there was some heavy thunderstorm activity in the Tioga County and northwestern Lycoming County regions that sent Big Pine Creek’s flow from a little over 100 cfs to more than 1200 cfs. Since then, Pine has been running well above its median daily statistic from data of 94 years. Today, after a spike to 350cfs on October 8th, Pine is flowing (at the Cedar Run gauge) at 209 cfs.

Penn’s Creek at the Penn’s Creek USGS gauge also spiked yesterday to 150 cfs and is presently spot on for its median flow at 89 cfs, with 83 years of data. Water temperatures in both streams are in the mid-fifties.

The fishing report for Penn’s Creek has Slate Drakes hatching most days from about ten AM until 2 PM, and there is also activity of October Caddis, Blue-wing Olives, and Crane Flies. Nymphs of these species would also take fish, along with some attractor drys, terrestrials, and streamers.

Following up on my fishing trip (article posted here on October 4th) to Spring Creek on October 3rd, the lower three miles of Spring Creek also has adequate flows to permit fishing, where you’re not having to worry so much about spooking the trout. There are no Slate Drakes on Spring Creek, but there are sporadic hatches of caddis, tricos, fairly regular but spotty, around mid-day, and #18 BWO’s in late afternoon. The flow at Milesburg spiked at 260 cfs on October 7th, and has leveled off at 139 cfs, right on the median flow.

For more information contact these fly shops:

Penn’s Creek Angler – Bruce Fisher, (570) 922-1053

McConnell’s Country Store and Fly Shop – (570) 753-8241

Slate Run Tackle Shop – (570) 753-8551

There are direct website links to all three fly shops on my links listed on the right. Get out there and wet a line. I’d be going out myself this weekend, but I have plans to work at the cabin with my huntin’ buddies in preparation for deer camp. Tight lines everyone!

PS: Oh, I have to add this, the band Flipside, with whom I sat in on drums a couple weeks ago on Mustang Sally; they are playing this Sunday from 5 – 8 PM at the Trout Run Hotel. It’s an odd time, but in between “games.” I saw the keyboard player / guitarist / band leader at another bar this past Monday. We enjoyed the cheese steak special and a few beers at The Crippled Bear. We already worked it out for me to sit in again on Sunday. Ride, Sally, Ride! I’d have someone video it, but my camera is broken and I have not yet replaced it.


Doc Fritchey Trout Unlimited Chapter Meeting

$
0
0

I would like to announce for anyone that lives within reasonable driving distance of the south-central Pennsylvania area, specifically the state capital of Harrisburg, that I am presenting the program this Tuesday evening, October 22, at the monthly meeting of the Doc Fritchey Chapter of Trout Unlimited.

My program topic is Wyoming’s Miracle Mile. This presentation details a fishing trip I made some years ago to the Miracle Mile section of the North Platte River. My slides include photographs of beautiful rugged Wyoming scenery, plus images of the river and the areas we fished. Fly patterns, tactics, water conditions, tackle, and playing and photographing fish will be included in the presentation.

The meeting program starts at 7:30 PM and will be held in the Hunt Club room on the second floor of the Bass Pro Shop in the Harrisburg East Mall on Paxton Street in Harrisburg. This is right off I-83. The meeting is open to the public. Come and bring a friend!


Arts of the Angler Show – November 9 – 10

$
0
0

I would like to remind my readers and their friends that this coming weekend, the Catskill Fly Fishing Center and Museum will hold its annual Arts of the Angler Show at the Ethan Allen Inn, in Danbury, Connecticut. The Ethan Allen Inn is located off I-84 at Exit 4, Lake Avenue. The Arts of the Angler Show is a full feature fly fishing show in an elegant atmosphere.

Saturday hours are from 8:30 AM until 5:00 PM. Sunday hours are from 9:00 AM until 3:30 PM. Admission is $12 per day or $20 for both days. Saturday evening will feature a price-fixed dinner for $23, including tax, gratuity, and a complimentary glass of wine. A live auction is scheduled to start at 7:00 PM. Dinner reservations must be made at the front desk by 2:00 PM Saturday.

The Fly Tying Studio kicks off Saturday morning at 11:00 AM. The first session features yours truly, tying the White Ghost streamer. I will be demonstrating this Carrie Stevens pattern using her authentic and original Rangeley-style of streamer construction, with a few personal modifications such as the type of cement I use to fasten the wing assembly. Also, my use of rayon floss and mylar tinsel does not inherently alter the characteristic of her flies. Oh, and I tie my streamers with a vise. She tied without a vise, and I tried a few of her patterns that way. Honestly, I don’t know how she pulled that off, some of her pattens, yeah, but the more complex ones, you got me. But that’s one reason why Carrie Stevens is one of the greatest female fly tiers who ever lived. My procedure for tying and teaching her streamer patterns and methods is the result of years of experience, but more specifically, from the study of personal photos that are copies of Austin Hogan’s notes on Carrie’s tying methods, which were created by his deconstruction of her patterns. I also incorporate a few techniques adapted from one of the best streamer tiers in the country, Mike Martinek, Jr. Mike was with Austin Hogan in the late 1960′s on one occasion when they disassembled four of Mrs. Stevens’ flies, so he has an inside view and experience and level of knowledge that no other living streamer tier possesses. Thanks Mike, for sharing your knowledge!

Other fly tiers featured in the Fly Tying Studio on the hour are Safet Nickocevic, Peggy Brenner, “Fishy”Fullum, and John Likakis. More than thirty-five fly tiers are scheduled to participate in this event.

Here is a link to the Catskill Fly Fishing Center and Museum site on the show, this includes photos and descriptions of the Live Auction items. http://www.catskillflyfishing.org/programs-events/art-of-the-angler-show/

For more information, call the Catskill Fly Fishing Center and Museum: 845-439-4810. Please come and support the Catskill Fly Fishing Center and Museum.

To whet your appetite, and to give you something to look at, here is a photo of a White Ghost streamer:

White Ghost streamer, Carrie Stevens pattern tied and photographged by Don Bastian. The hook is a size #1 - 8x long Gaelic Supreme Martinek / Stevens Rangeley Style Streamer.

White Ghost streamer – a Carrie Stevens pattern tied and photographed by Don Bastian. The hook is a size #1 – 8x long Gaelic Supreme Martinek / Stevens Rangeley Style Streamer.


Cheney Bass Fly and A. N. Cheney’s Hardy Reel

$
0
0

A couple months ago I received an e-mail message from a potential customer. He had been searching online for information about fly patterns connected to Albert Nelson Cheney. This is the same A. N. Cheney who co-authored Fishing With the Fly in 1883 with Charles F. Orvis. Cheney is also referred to quite frequently in Mary Orvis Marbury’s 1892 book, Favorite Flies and Their Histories. My customer, Howard Weinberg, reached out to me “because my name kept coming up” during his internet quest for information. It’s good that my name came up in association with historic and classic fishing fly patterns, rather than say, any number of other topics I might be connected to if circumstances were different. During a brief exchange of e-mail messages, Howard and I agreed that I would tie a half-dozen each of the Puffer, a 19th century Adirondack trout fly that was used and probably named by Mr. Cheney, and the Cheney, a Bass Fly pattern that was published in Marbury’s Favorite Flies.

Of the Puffer, Cheney had one in his possession, that he described to “A little brown-eyed maiden, once, looking into my fly book, asked why I had the old, frayed flies tied up in separate papers, and marked, while the nice new flies did not show this care. Had she been of maturer years, I might have quoted Alonzo of Aragon’s commendation of old friends; but, instead, I merely said: ‘The nice new flies I can easily buy, but no one sells such old flies; therefore I take the greater care of them because of their rarity.’ ” Favorite Flies, p. 349.

“On another page we find him looking over these same old flies, and he says; ‘Take for instance this one, with the legend written on its wrapper: Puffer Pond, June, 1867 -thirty-five pounds of trout in two hours. The last of the gentlemen that did the deed.’ This to me, tells the very pleasant story of a week spent in the Adirondacks. I remember, as I hold the ragged, faded fly in my hand, and see that it still retains something of the dark blue of its mohair body and the sheen of its cock-feather wings, that it was one of six flies I had in my fly book that day in June that stands out from other June days, in my memory, like a Titan amongst pygmies. That fly had no name, but the trout liked it for all that, and rose to it with as much avidity as though they had been properly introduced to some real bug, of which this was an excellent counterfeit. That glorious two hours’ time, with its excitement of catching and landing without a net some of the most beautiful and gamy fish that ever moved fin, comes back to me as vividly as though at this moment the four walls of my room were the forest-circled shores of that far-away pond, and I stand in that leaky boat, almost ankle-deep in the water that Frank, the guide, had no time to bail, occupied as he is in watching my casts, and admiring my whip-like rod during the play of the fish or fishes, and in turning the boat’s gunwale to the water’s edge to let my trout in when they are exhausted. It is sharp, quick work, and the blue-bodied fly is always first of all the flies composing the cast to get a rise, until I take off all but the one kind, and then, one after another, I see them torn, mutilated, and destroyed. Later, they will be put away as old warriors gone to rest, and their epitaph written on their wrappings; ‘Thy work was well done; they rest well-earned.’ ” Favorite Flies, pp. 349-50.

“The fly without a name, that awakens memories of ‘that June day that stands out from other June days’ is now called the Puffer.” Favorite Flies, p. 350.

Cheney was instrumental in the creation of the bass fly pattern that bears the heritage of his name. In the 1880′s, Mr. Cheney was visiting the Orvis fly tying room in Manchester, Vermont, seeking to develop a new bass fly pattern. According to the account in Marbury’s book, p. 402: “One summer when Mr. Cheney was staying at Schroon Lake, a few flies, all of them new combinations, were sent to him to try. Among them was a fly like that of the present Cheney fly, but with a black wing. Later in the season Mr. Cheney visited Manchester, when he said, “If that fly had a different wing, it would be just about my idea of a perfect fly for black bass.” Feathers were therefore inspected to find a more suitable wing, and finally those of the mallard with a black bar decided upon. The fly was then made, under Mr. Cheney’s supervision. When finished to his satisfaction he named it the Cheney, and his success with the fly in many different waters has proved the correctness of his theories and conclusions drawn from previous experiments.”

I tied the Puffer fly for Adirondack trout, in sizes #6 and #8, and the Cheney Bass Flies in #2 and #4. Then I went about and prepared to photograph those flies for a blog post in conjunction with the bonus photographs that are included here, before I mailed them to my customer. That’s the day my camera fell from the TV tray and landed on the hardwood floor. This fall rendered the camera a total wreck and useless for anything except a paperweight or perhaps a shooting practice target item from that day forward. Which I felt like doing, but in actuality I think I can still get a trade-in allowance for it in the purchase of a new / used camera. I intended to replace it last month, but Abigail, my Cocker Spaniel, (see the topic “Boat Dog” from June 2013), required urgent surgery for a tumor on her spleen. That set me back almost $1100, so the camera allowance was eaten up by the life-saving operation on the dog. Abigail is doing great, so all is well!

Hence, my original plan to post photos of the Puffer and Cheney flies and photos of an antique Hardy brass-faced reel that was owned by and is engraved with the owner’s name, A. N Cheney, has still come to fruition, though not entirely as originally intended. My deepest thanks go to my customer, Howard Weinberg, for taking these photos of his valuable, collectible Hardy Perfect brass-face reel and the Cheney Bass Flies.

Antique brass-faced Hardy perfect Reel, once owned by Albert Nelson Cheney. Photo by Howard Weinberg.

Antique brass-faced Hardy Perfect Reel, once owned by Albert Nelson Cheney, co-author with Charles F. Orvis of their 1883 book, Fishing With the Fly. Photo by Howard Weinberg. Forster Hardy was first granted a full patent for the Perfect reel design in 1889.

A. N. Cheney's Hardy Perfect reel, with two Cheney Bass Flies, tied by Don Bastian. Photo by Howard Weinberg.

A. N. Cheney’s Hardy Perfect Reel, with two #2 Cheney Bass Flies, tied by Don Bastian. Photo by Howard Weinberg. The flies are dressed on vintage Mustad 3906 wet fly hooks.

Hardy reel that belonged to A.N. Cheney of Glens Falls, New York; once editor of

Hardy Perfect Reel that belonged to A. N. Cheney of Glens Falls, New York; Cheney was the editor of the fishing department of Shooting and Fishing. Photo by Howard Weinberg.

Cheney's Hardy perfect reel with Cheney Bass Fly tied by Don Bastian.

Cheney’s Hardy perfect reel with Cheney Bass Fly tied by Don Bastian. Photo by Howard Weinberg.

I think it is amazing to think that Cheney possibly used this reel to fish his Cheney Bass Fly, or that he fished the Puffer in a wet fly cast for trout. Here is the recipe for the Cheney:

Cheney

Tag: Flat silver tinsel

Tail: Green parrot (or goose shoulder) and barred wood duck

Ribbing: Oval silver tinsel over the rear half of the body

Body: Rear half white floss; front half red chenille

Hackle: Yellow collar

Wing: White-tipped black-barred mallard wing coverts, paired as a spoon wing

Head: Light olive with red band at rear of head

My rendition of the head on this fly was taken from one of my photographs of the actual Plate Fly for the Cheney; it is finished with a light olive thread with a red band, fairly well-done in comparison to most of the flies that sport the rather unkempt look of the reverse-winged head used on most of the patterns back then. I also used Elmer’s Rubber Cement to glue the wing feathers together prior to mounting them to the hook, a technique I borrowed from my assembly of streamer wing hackles – shoulders – cheeks for Carrie Stevens’ fly patterns. This works great for winging some of these large-spoon winged flies that may present problematic feathers or mounting when tied in. The cement is applied just along the stem, for a half an inch or so, then pressed and held together for ten to fifteen seconds. Sometimes I lay the cemented wing down and place an object like an extra pair of scissors on the wing; the weight helps to hold them together while the cement sets.

Below is a photo of the Puffer from the 1893 Orvis Display at the American Museum of Fly Fishing in Manchester, Vermont.

The Puffer wet fly, an Adirondack trout fly pattern.

The Puffer wet fly, an Adirondack trout fly pattern. This fly is labeled in Mary Orvis Marbury’s handwriting, from the 1893 Orvis Fly Display, presently held at the American Museum of Fly Fishing in Manchester, Vermont. Photo by Don Bastian.

Puffer

Tag:                 Fine flat gold tinsel

Tail:                 Red duck or goose quill

Ribbing:          Fine flat or oval gold tinsel

Body:               Dark blue mohair dubbing

Hackle:            English grouse, or dark brown mottled hen

Wing:              Iridescent blue rooster or mallard wing  sections

Head:              Black thread

This dressing for the Puffer is correct according to study of this photo and the information presented in the text of Marbury’s book. I hope you have enjoyed this trip back in time!


Viewing all 111 articles
Browse latest View live